Quick Links:
- Game Information
- Layout
- Modes of Play
- Basics
- Skill Shots
- Paddock Modes (Dinosaurs)
- T-Rex Events
- Control Room Modes
- Multiballs
- Other Modes & Features
- Wizard Modes
- Competition Install Notes
Game Information:
- Lead Designer: Keith Elwin
- Code/Rules: Rick Naegele, Keith Elwin
- Lead Mechanical Engineer: Harrison Drake
- Artwork: Jonathan Bergeron (Johnny Crap)
- Computer Graphics Art Director: Chuck Ernst
- Lead Sound Designer: Jerry Thompson
- Release Date: July 2019
- Wiki Rulesheet based on Code Rev: 1.10
- Edit the Code revision, if applicable, when you make changes
Jurassic Park is the second Stern Pinball machine designed by Keith Elwin. Directly after the events of the film, Nedry’s computer virus has continued to plunge the park into chaos - meaning the dinosaurs are loose and the employees are in danger. The player has to rescue as many staff as they can and capture the dinosaurs, all while trying to survive the horrors of the abandoned park and eventually staging an escape.
Layout:
Premium/LE: |
Pro: |
|---|---|
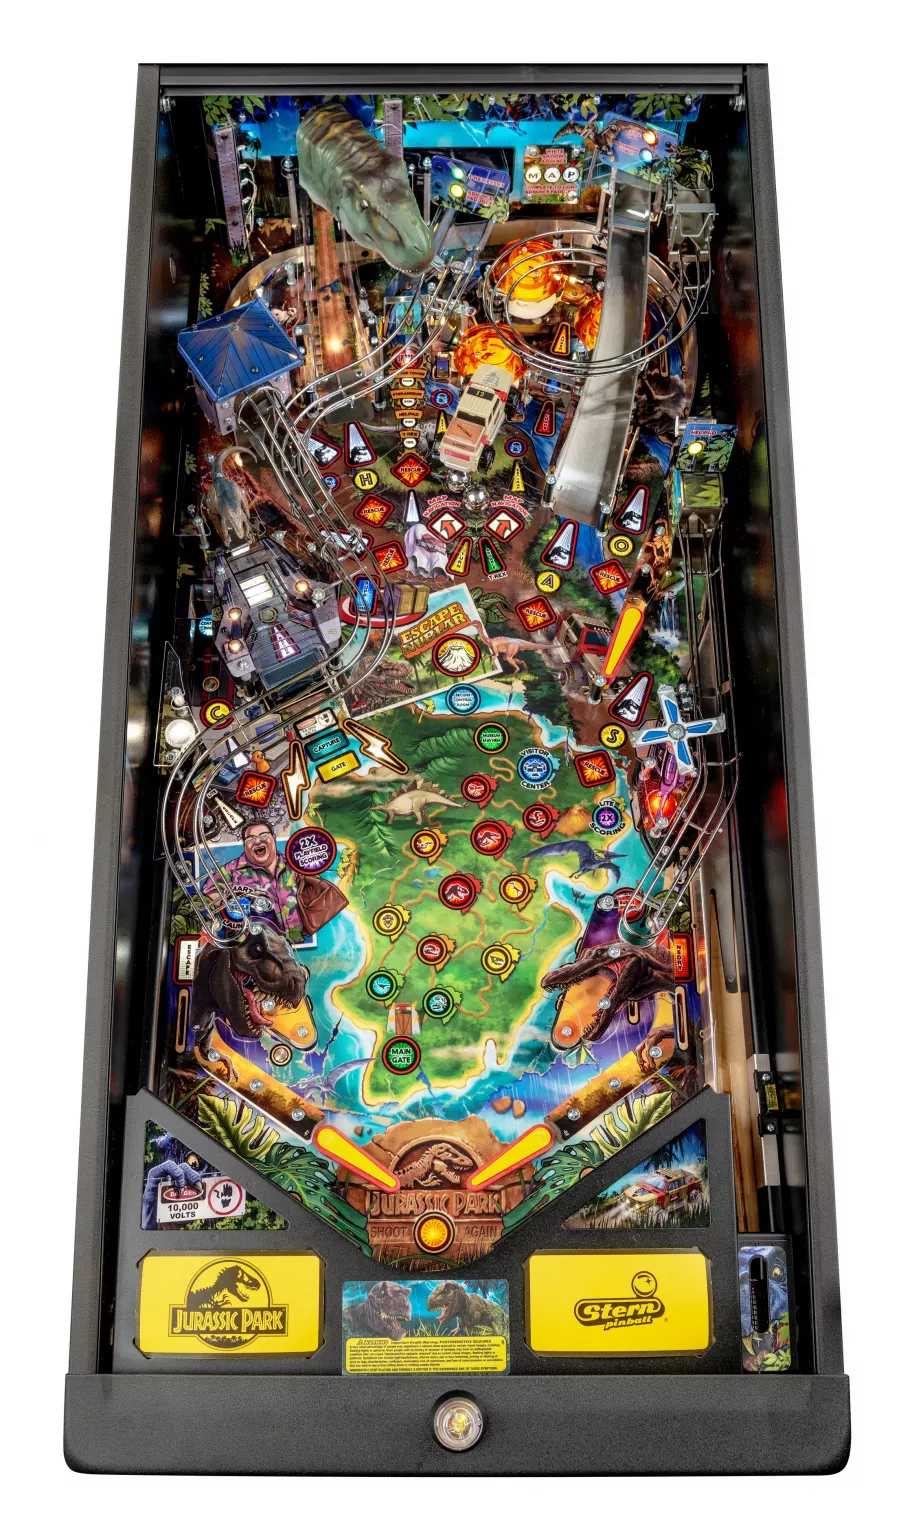 |
 |
Modes of Play:
These modes are accessible by holding both flipper buttons during attract mode until a menu appears. The following options are available:
- Standard: See below for full rulesheet.
- Competition: Same as Standard but with elements of randomness removed.
- Escape Nublar Challenge: In this challenge mode you play a modified version of the Escape Nublar Wizard Mode.
- Competition: Escape Nublar Challenge: Same as Escape Nublar Challenge but with elements of randomness removed.
- Cooperative: All game progress is saved between players.
- Team Play: Splits players into teams that share all game progress.
- DJ Mixer: NOT a gameplay mode. This mode operates like a Jukebox, allowing you to play the music featured in the machine, including a number of specific playlists.
Basics:
- Nedry has taken full control of Jurassic Park following the evacuation of John Hammond and the park’s first visitors. The player must evacuate all remaining staff and capture the escaped dinosaurs.
- Shoot lit white arrows to spell MAP, then the left ramp to enter a Paddock. In any Paddock, shoot the flashing red “rescue” shots until the yellow “trap” targets light. Hit as many as required, then capture the dinosaur by hitting the yellow / green flashing shot. Each dinosaur has unique perks shown on the display.
- Completing certain tasks lights the left target for Control Room. Three modes are available and can be chosen using the flippers and action button.
- Hitting the truck three times starts a T-Rex hurry-up that leads into a Multiball. Every four times after that, it will light one of three modes at the left ramp.
- Spelling CHAOS in order, then hitting the target between the bumpers starts Chaos Multiball.
- Locking a ball in the center of the raptor pit, then hitting the raptor pit enough times starts Raptor Tri-Ball.
- Shooting the right ramp enough times starts Pteranodon Attack. Build up a switch value, then shoot the right ramp to collect it.
- If “Smart Missile” is lit at the left return lane from enough “rescue” shots, use the action button to select which award you want, then shoot the target between the bumpers.
- Hit the three purple standups, then the large standup near the side ramp for helpful supply drops and 2x scoring. Make upper loop shots to light the large standup for even better awards.
Skill Shots:
The skill shot on Jurassic Park is a combo sequence: following a full plunge, the left ramp must first be shot, then the right ramp, then the side ramp, then the right orbit. The base value of the skill shot is 2M; each shot in the sequence awards 2x (Super Skill Shot), 4x (Double Super), and 6x (Ultra Super) the base value, and adds 3 additional seconds of ball save time (and lights escape at the left outlane if all four shots were completed). Making any skill shot increases the base value by 1M for the next ball’s skill shot.
While lit for Skill Shots, the shots involved in the sequence will not start modes qualified on the prior ball. However, they will collect CHAOS letters and Rescues if they are currently lit, and the Extra Ball at the right ramp can be collected.
Secret Skill Shots: Plunge the ball lightly so it lands on either the left or right flipper, then make any of these shots right away to score a Secret Skill Shot.
- “C” lane for 6M + 3 seconds ball save.
- “O” lane for 8M + 3 seconds ball save.
- Pops standup for 10M + 3 seconds ball save.
- Pops standup from the right flipper for 20M + 12 seconds ball save + increased Amber value.
MXV Skill Shot: Completing the normal Double Super Skill Shot sequence with a shot to the upper loop immediately before the side ramp will score the MXV Skill Shot. The side ramp will switch from scoring 4X the initial shot to instead score as a Super Skill Shot of 8X the initial shot. This sequence also awards a 2-way combo worth at least 2M.
Paddock Modes (Dinosaurs):
The Paddocks make up the majority of Isla Nublar and are home to many different dinosaur species - until they broke loose and began to target the staff. To light “Advance Paddock”, shoot the white arrows to spell MAP. The first Paddock requires only one white arrow shot to light “Advance Paddock”, while further Paddocks require three. Shoot the left ramp when lit to advance to the next Paddock, or shoot the truck to change between the left or right paths shown above the flippers.
After shooting the left ramp, the ball will be held at the left inlane and information about the paddock will be shown on screen before the ball is released. Your goal in each Paddock is threefold:
- Rescue a certain number of park staff.
- Set the trap at the “Set Trap” targets (and visit the Helipad for more difficult Paddocks).
- Capture the dinosaur by shooting the flashing yellow / green shot.
Paddocks can also be instantly cleared by activating the Smart Missile, choosing “Clear Paddock” with the action button, and successfully making the target shot.
After capturing your first dinosaur, Control Room is lit.
After leaving either Level 4 Paddock, spelling MAP again will light the left ramp for Visitor’s Center.
Rescues:
Before the trap can be set, at least 1 rescue will have to be made to qualify it. The first Paddock only requires 1 rescue; harder paddocks may require up to 4. The moving green arrow represents the position of the dinosaur, while the lit red Rescue shots represent staff in the park who are in danger of being injured.
The dino (green arrow) will move towards the closest lit Rescue shot; the speed that the dinosaur moves at is determined by its “aggression” trait. If the dino moves to a shot that is lit for Rescue before you collect it, the green arrow will start blinking faster and faster before the park staff is injured and Rescue is unlit at that shot. Shooting the dino shot - even if Rescue isn’t lit at that shot - temporarily slows the dino by pausing its pursuit for a few seconds. They can also be slowed down by using the action button when lit for Super Tranquilizer.
The current number of Rescues along with the current Rescue Streak for collecting them without missing any is shown at the top-right of the display. Each rescue awards points influenced by the current Rescue Streak. Rescues can also be awarded from the Smart Missile (either 5 or 10) or by completing Fossil Set 4 (10). Clearing an entire Paddock without missing any Rescues scores the Perfect Paddock bonus worth 2x the Paddock’s bounty value and a bonus +1x to the Amber Bonus.
The total number of Rescues across your game also count up to qualify additional awards (subtract one Rescue from each Light Inlanes threshold if Ankylosaurus has been captured):
- 3 (2) Rescues: Light Inlanes (for Smart Missile and Super Spinner)
- 6 Rescues: Light Extra Ball
- 8 (+4 from prior Light Inlanes level, minimum of 6) Rescues: Light Inlanes
- 13 Rescues: +1x Bonus X
- 15 (+6, min. 12) Rescues: Light Inlanes
- 22 Rescues: (?)
- 24 (+8, min. 20) Rescues: Light Inlanes
- 30 Rescues: Fossil
After the dinosaur has been captured, the player can continue collecting Rescues and advancing towards Perfect Paddock during normal play.
Capturing the Dinosaurs:
After collecting the minimum number of rescues required for the current Paddock, the Set Trap targets on both sides of the truck will light. Easier paddocks will only require you to hit one of those two targets; harder paddocks will eventually require hitting both targets, or even having to hit both targets in order. Harder paddocks also require the player to shoot the Helipad before being able to capture the dinosaur, with only a short timer to capture the dinosaur before you have to refuel the helicopter by shooting the Helipad again. Once either the Set Trap targets have been completed or the Helipad has been shot, shooting the flashing green / yellow shot will capture the dinosaur.
(Note: if all of the staff in a Paddock have been either rescued or injured, the dinosaur will begin to move back to the shot where it started from and eventually escape, and none of its Bounty, Perks, or other capture benefits will be awarded. Avoid these by balancing out the priority of Rescue shots, making sure that there are enough staff remaining to distract the dinosaur while trying to capture it.)
(Note: If there are no staff members left in a paddock, but you still require rescues to set the trap, the trap targets will light anyway. Giving you a small window to capture the dinosaur and gain its perk)
Paddock List:
A list of every Paddock’s dinosaur, as well as their characteristics, can be viewed below. These are included only for completion’s sake. The Levels listed below represent the “outside pairs” of Paddocks. The .5 levels are the Super Predators (the Paddocks up the middle of the map), which can be skipped through intentional truck positioning.
Dinosaur Characteristics: Each dinosaur has different characteristics that impact gameplay:
- Diet: Carnivores will go straight toward the nearest Staff while herbivores will amble around randomly.
- Aggression: The speed at which the dino (green arrow) pursues the staff (Rescue shots).
- Trait: How the Dino arrow moves and impacts Staff.
- Staff in Peril: Total # of Rescues available at this paddock.
- Bounty: Immediate points awarded for capturing the Dino.
- Amber Bonus: Multiplier applied to the next collected Amber Bonus.
- Perks: Benefits which remain in effect for the rest of the game.
- Bonus Multiplier: Capturing Super Predators increases the Bonus X.
Level 1
- Light Set Trap: 1 Rescue
- Set Trap Targets: Both lit, shoot 1.
Note: Helipad not required, 2 adjacent shots lit to capture Dinosaur.
| Species | Gallimimus (Left Side) | Brachiosaurus (Right Side) |
|---|---|---|
| Diet | Omnivore | Omnivore |
| Aggression | Low | Very Low |
| Trait | N/A | N/A |
| Staff in Peril | 5 | 5 |
| Bounty | 2.5M | 2.5M |
| Amber Bonus | +4x | +4x |
| Perk Awarded | 2x Bounties | +200k Rescue Streaks |
| Bonus X | N/A | N/A |
Level 1.5 (Super Predator)
- Light Set Trap: 2 Rescues
- Set Trap Targets: Both lit, shoot 1.
| Species | Spitter (Dilophosaurus) |
|---|---|
| Diet | Carnivore |
| Aggression | Medium |
| Trait | Immobilizes Staff (prevents staff from being rescued for 5 seconds) |
| Staff in Peril | 7 |
| Bounty | 5M |
| Amber Bonus | +5x |
| Perk Awarded | +2x Super Spinner |
| Bonus X | +1x |
Level 2
- Light Set Trap: 2 Rescues
- Set Trap Targets: Both lit, shoot 1.
| Species | Triceratops (Left Side) | Ankylosaurus (Right Side) |
|---|---|---|
| Diet | Herbivore | Herbivore |
| Aggression | Medium | Medium |
| Trait | N/A | N/A |
| Staff in Peril | 6 | 6 |
| Bounty | 7.5M | 7.5M |
| Amber Bonus | +5x | +5x |
| Perk Awarded | Easier Loop Awards (-1 per loop) | Easier Inlanes (-1 Rescue threshold) |
| Bonus X | N/A | N/A |
Level 2.5 (Super Predator)
- Light Set Trap: 2 Rescues
- Set Trap Targets: Both lit, shoot both.
| Species | T-Rex |
|---|---|
| Diet | Carnivore |
| Aggression | Extreme |
| Trait | N/A |
| Staff in Peril | 8 |
| Bounty | 7.5M & Extra Ball |
| Amber Bonus | +6x |
| Perk Awarded | Longer Timers (+8 seconds to all timers) |
| Bonus X | +1x |
Level 3
- Light Set Trap: 2 Rescues
- Set Trap Targets: Both lit, shoot both.
| Species | Stegosaurus (Left Side) | Compsognathus (Right Side) |
|---|---|---|
| Diet | Herbivore | Carnivore |
| Aggression | Medium | Medium |
| Trait | N/A | Can’t be Stunned |
| Staff in Peril | 7 | 7 |
| Bounty | 10M | 10M |
| Amber Bonus | +6x | +6x |
| Perk Awarded | +15k/Pop Amber | +250k Combos |
| Bonus X | N/A | N/A |
Level 3.5 (Super Predator)
- Light Set Trap: 3 Rescues
- Set Trap Targets: Left lit, shoot left, then Right lit, shot right
| Species | Spinosaurus |
|---|---|
| Diet | Carnivore |
| Aggression | Very High |
| Trait | Water Travel (can jump from one side of island to the other) |
| Staff in Peril | 10 |
| Bounty | 10M |
| Amber Bonus | +7x |
| Perk Awarded | Light King of the Island Multiball |
| Bonus X | +1x |
Level 4
- Light Set Trap: 2 Rescues
- Set Trap Targets: Left lit, shoot left, then Right lit, shot right
| Species | Pteranodon (Left Side) | Raptor (Right Side) |
|---|---|---|
| Diet | Carnivore | Carnivore |
| Aggression | High | High |
| Trait | Can Fly (jumps directly to any flashing Rescue shot) | Hunts in Packs (deal with 2 of them at once - complete the Capture sequence twice, once for each Raptor - super tranquilizer stuns both) |
| Staff in Peril | 10 | 10 |
| Bounty | 12.5M | 12.5M (including the 2.5M for 1st raptor) |
| Amber Bonus | +7x | +7x |
| Perk Awarded | 2x Chaos Jackpots | 2x Raptor Jackpots |
| Bonus X | N/A | N/A |
T-Rex Events:
Shoot the truck to complete “T-REX” and light the left ramp to start a T-Rex Event mode. The first two T-Rex Events award letters for any truck hit; later events require a full turn of the truck.
On default settings, Feed T-Rex is always played as the first mode of the game, and the other three modes cycle with shots to the truck in the following looping order: Chase → Encounter → Rampage → Chase. On Prem/LE, a lit L ramp will literally feed the animatronic T-Rex, while the Pro will hold the ball via the left inlane up-post during each mode’s introductory sequence. (On Competition Install settings, the first available mode will not necessarily be Feed T-Rex, and the Feed T-Rex mode will not start immediately on spelling completion at the captive ball.)
Play all four events to qualify Museum Mayhem as the final event. After playing Museum Mayhem, Feed T-Rex will be the only T-Rex mode offered, with increasing difficulty of starting it each time.
Completing any single-ball T-Rex Event awards a Fossil and a Time Bonus worth 1M per seconds remaining in the mode. Other non-Control Room modes and one multiball may be started during a non-multiball T-Rex mode.
- Feed T-Rex: On default settings, this hurry-up mode starts immediately after spelling T-REX, making it a good objective for novice players to go for. This starts as a single-ball hurry-up mode and turns into a 2-ball multiball once the hurry-up has been collected. A 500K hurry-up is lit at the left ramp along with a 20-second timer. Shoot orange arrows to reset the hurry-up to increasingly higher values up to a max of 6.75M (also unlighting that shot), and reset the timer to 20 seconds. Shoot the T-Rex at the left ramp to collect the hurry-up and start T-Rex Multiball. During T-Rex Multiball, all 5 CHAOS shots are lit for jackpot values that start at the hurry-up value you collected. Each jackpot increases the next one by 250K and adds a +1x multiplier to the next value if shot from left to right. The left to right rule is indicated by jackpots lit with the color red. Whether you shoot the jackpots from left to right or not, after all 5 jackpots have been collected, Super Jackpot is lit at the left ramp for the sum of the collected jackpots; collecting the Super Jackpot relights the jackpots for another attempt and resets the multiplier.
- T-Rex Chase: Alternate shots between a single orange flashing shot to dodge the T-Rex for 3M (+3M) and the truck to shift gears for 1M (+1M). “Dodge” shots made under three seconds after “shift” shots will score double their normal values, and collected Dodge shots will not be available a second time. Completing this sequence 5 times finishes the mode and awards a Fossil.
- T-Rex Encounter: Shoot the truck for 2M; then, alternate between orange arrows (4M, then 8M, then 11M) to free the trapped worker and the left ramp to distract the T-Rex (5M). The difficulty of the shots determine the value: the Helipad and center spinner score 1x, the right ramp scores 2x, and the right orbit scores 3x. Free three trapped workers to finish the mode and collect a Fossil.
- T-Rex Rampage: Shoot the left or right ramp to lower the T-Rex, then shoot the left ramp to collect 10M (+5M per left ramp shot). Shooting the Raptor Tower or Helipad prior to the left ramp will multiply the award by 3x or 2x, respectively, and the two multipliers can be stacked for a 6x multiplier. You can repeat this sequence an unlimited amount of times until the mode timer expires, and completing the sequence three times collects a Fossil when either the timer expires or you drain.
Control Room Modes:
Control room modes are lit by:
- Capturing your first dinosaur
- Spelling CHAOS twice
- Getting a Jackpot in Raptor Tri-Ball
- 15 tower shots
Hitting the Control Room shot when lit catches the ball with the up-post, shows a display in the style of the Unix system from the film, and lets you select from one of three timed modes. Any mode that’s been played is greyed out. After all three modes have been played, Secure Control Room starts on the next Control Room shot.
Completing any Control Room mode awards a Fossil and a Time Bonus worth 1M per seconds remaining in the mode. Other non-T-Rex Event modes and one multiball may be started during a Control Room mode.
- Virus Attack: Shoot any lit shot (3M, 4M, & 5M for all subsequent shots) to light the Control Room for 10M + the total of the shot values collected prior, a total of three times. Making the third shot to the Control Room finishes the mode and awards a Fossil.
- Restore Power: Shoot the spinner for 3M, which lights all other shots. Then shoot all other seven lit shots to collect a value per shot equaling 3M +50K/spin during the mode, multiplied by the number of shots that have been made (excluding the initial spinner shot). The final shot finishes the mode, and awards 1M x seconds remaining along with a Fossil.
- System Boot: Shoot one of three initial blue-lit shots (Left Ramp / Helipad / Spinner) to light a new set of shots and then shoot one to complete the combo and flip a switch (difficulty of the shot determines the value). The combo shots and their scoring are as follows.
Left Ramp (5M) → Right Ramp (8M) / Helipad (12M) / Right Orbit (15M)
Helipad (7M) → Left Ramp (6M) / Spinner (8M) / Control Room (15M) / Raptor Pit (20M)
Spinner (9M) → Supply Drop (15M) / Loop (20M) / Raptor Tower (25M)
Complete all three sets of combos to light the final shot at the control room. The final shot value is the sum of all of the 2nd shots of each combo + the time bonus (1M x seconds remaining) & awards a Fossil.
Invalid Frenzy:
This hidden mode is awarded if all three Control Room modes have been played and the player lights & starts it using whatever method they haven’t used yet, or if they select “??INVALID??” off of the Smart Missile.
This is a four-ball multiball where the jackpot is qualified at the control room shot by hitting a certain number of switches. Once collected, the control room will immediately relight for a triple jackpot. After collecting the triple jackpot the process of lighting the jackpot resets, and it will have to be re-lit again via more switch hits than before. “Major" switches will build the jackpot value faster than “minor” switches and the jackpot value becomes locked once it is lit.
Hitting any switch in the raptor pen will build towards an add-a-ball, with additional hits required for each subsequent add-a-ball.
Multiballs:
(Note - Add-A-Balls can be collected during any Multiball by qualifying the Supply Drop target, then shooting it. Chaos Multiball is the exception to this rule, described below.)
Chaos Multiball:
Five shots are marked with letters in the word CHAOS. Each letter must be collected in sequential order to light the pops target for Chaos Multiball. On subsequent attempts, two completions of CHAOS will be required to light Chaos Multiball; other awards, such as points or lighting Control Room, will be substituted for the first spelling of CHAOS. You can also collect letters in CHAOS off of Supply Drop, or complete CHAOS in one shot off of a successful Smart Missile award.
Phase 1
At the start of this 3-ball Multiball, Jackpots will be lit on all shots on one half of the playfield, depending on the direction of the truck, and each jackpot shot won’t be made available again until a super jackpot has been collected or the truck has been hit. Hit the truck to switch sides and light all the other side’s jackpots, including the shots you’d previously hit. The more jackpots you collect on one side before switching, the more they’re worth - and they will continue to increase the super jackpot value. The first super jackpot is lit at the amber target after collecting 1 jackpot, with 2 jackpots required to light the second and third super jackpots and 3 jackpots to light the fourth and fifth super jackpots. If a maximum of 1 jackpot is remaining lit, a lit super jackpot can also be collected at the truck (full turn). Each super jackpot awards the sum total of the jackpots collected between each super jackpot, and awards one letter in CHAOS (shown on the display and as solidly lit CHAOS inserts on the playfield).
Phase 2
Collect all 5 super jackpots across Chaos Multiball attempts to light the five letter shots for jackpots, which can be shot in any order. Each letter is worth the base value earned when collecting that letter’s super jackpot in phase 1.
Scoring at least one of these letters will award you with a Fossil at the end of the multiball. After the five CHAOS letters have been scored, the pop bumper target will be lit to score the Chaos Hurry-Up, worth the combined value of all the CHAOS letters. If the Truck is facing the left, this value will be doubled. Collecting this Hurry-Up will restart the multiball back to phase 1.
Hitting the pop bumpers enough times (10 for the first add-a-ball) will immediately launch another ball into play with a short ball saver. Each add-a-ball requires 10 more pops than the last. While supply drops won’t award add-a-balls during this mode, it is possible to claim one during the grace period after Chaos Multiball ends.
Raptor Tri-Ball:
Complete the Raptor Pen standup targets two times (+1 per subsequent attempt) to light Raptor Capture at the center target. A shot to the dead end lane will instantly count as a completion of all of the targets. After a raptor has been captured, additional shots to the enclosure will weaken the fence; once the integrity is at 0%, one last shot to the dead-end lane will start Raptor Tri-Ball. The first Raptor Tri-Ball starts with the fence at 50% integrity, and the fence integrity decreases more on shots to the dead end lane. The lightning bolt inserts will flash when Raptor Tri-Ball is ready to start. You can also start Raptor Tri-Ball for free off of a successful Smart Missile award.
Raptor Tri-Ball is a four-phase multiball, with rules that pay homage to the Tri-Ball from Data East’s original Jurassic Park pinball machine.
Phase 1: Raptor jackpots (5M + 15K/switch)
The left and right ramp are lit red and will collect the raptor jackpot.
The 2nd ramp will collect double the current value of the raptor jackpot.
Phase 2: CHAOS jackpots (2M +15K/switch)
The CHAOS letters are lit. Every letter collects the current chaos jackpot
Phase 3: Super CHAOS jackpots (jackpot from previous phase keeps growing)
3 extra balls will be added (max 6 in play) and two red arrows are lit for super jackpots.
- Right ramp (2 x chaos jackpot x balls in play).
- Upper loop (3 x chaos jackpot x balls in play)
Collecting either Super Jackpot will also award you with a Fossil for your efforts.
Phase 4: Raptor rampage jackpots (2M + 15K/switch)
All CHAOS shots are lit red for Raptor Rampage victory lap jackpots. Each shot unlights when collected, but can be relit by shooting the Raptor Pen dead-end lane. Each full wave of Raptor Rampage jackpots completed will award a Raptor Rampage super jackpot, worth the sum total of Raptor Rampage jackpots collected. This phase will last for the remainder of the multiball.
All phases
Hitting all three targets in the Raptor Pen and then making the dead-end lane will double all Jackpots collected for 15 seconds. Hitting the now-captive ball on the Prem / LE will reset the 15 second timer; on the Pro model, the same basic rule applies to get 2x scoring, but the ball cannot be locked.
King of the Island Multiball:
Navigate to the Spinosaurus Paddock and capture the Spinosaurus to qualify King of the Island Multiball at the left ramp. This multiball must be played before moving on to the next Paddock, and takes priority over all other features.
This is a 3-ball switch-based Multiball where certain thresholds of switches qualifies light all major shots. Shoot one lit shot to collect a 1x jackpot. Then repeat the switch collection phase, followed by all major shots (except ones already collected) lit again for +1x to the jackpot value (2x, 3x, etc, up to 5x), but after locking in that shot jackpot, you then have to re-shoot your prior collected jackpot shots to requalify the switch phase. The multiplier keeps increasing for each subsequent jackpot. Each Jackpot has a different color corresponding to its multiplier, in the order of the rainbow (starting at red).
Other Modes & Features:
Smart Missile:
Collecting enough rescues lights the left inlane for “Smart Missile”. The next time the ball rolls through the lit left inlane, the inlane up-post (ala Cactus Canyon) will hold the ball and call for a shot to the pops standup target. Once the Smart Missile is activated, you will have 3 seconds to choose what you want the Smart Missile to award, using the action button to cycle through the awards; the award chosen when the timer expires will be scored with a successful shot to the target, in addition to 10M (+5M) for each successful Smart Missile that has been launched during the current game. Smart Missile alternates with Super Spinner via truck hits.
There are six possible choices, shown on the display in this order:
-
Choice 1
- Light Outlanes - Lights both (Escape and Nedry) ball saves at the outlanes.
- Super Supply Drop - Awards the next Super Supply Drop (choice available if both ball saves are already lit.) (note: do not select this option if you already have a super supply drop ready to be collected as it will just collect that supply drop and unlight the supply drop target)
-
Choice 2
- Super Combos - Combos score 5x for the remainder of the ball.
- Clear Paddock - If a Paddock is active, this will complete everything at the Paddock in one satisfying shot.
-
Choices 3 and 4 - Two different awards from the following options, with the last three not available until earlier options have been collected:
- Rescues - +5 Rescues at first; +10 Rescues will be added to the award pool later.
- Raptor Multiball - Immediately starts Raptor Tri-Ball. This also counts as having gone through the regular sequence of lighting it, meaning you’ll start over at the next difficulty for the next attempt.
- Extra Ball - Immediately awards an extra ball.
- Fossil - Spots a “wildcard” Fossil.
- Super Escape - For the remainder of the ball, “Light Escape” no longer needs to be qualified using the pops switch.
-
Choice 5 -
- ??Invalid?? - Why would Nedry do this?!
- Complete CHAOS - If the above was already earned, or any multiball and / or mode is active, the current cycle of CHAOS letters will be collected.
-
Choice 6 -
- Abort - Selecting this award will deactivate the Smart Missile and the inlane insert will flash instead of being lit solid. You can requalify it (lit solid again) with two shots to the truck.
Spinner & Super Spinner:
Shoot the four ramps to increase the spinner value from a base of 30K per spin. Each shot adds the following amount to the spinner:
- Left ramp: 15K
- Helipad: 30K
- Right ramp: 50K
- Tower: 100K
Thus when the whole spinner is lit, you will get 225K/spin. Shoot the spinner to collect the current value. After one shot, the value resets (ie. classic Stern spinner rules).
If the right inlane is lit for “Super Spinner” after collecting enough rescues, rolling through the inlane will cause each spin to be multiplied by the current Bonus Multiplier, +2x if the Spitter was captured, for a limited time. The lit inlane disappears when the ball drains and alternates with Smart Missile with truck hits.
Pteranodon Attack:
After four shots to the right ramp, Pteranodon Attack will start. This is a timed frenzy mode where all switches add 25K (+10K each subsequent Pteranodon Attack) to an award collected at the right ramp, which can be rebuilt/re-collected while there’s time left in the mode. Each threshold of 12 switches adds a multiplier to your next award that resets when the award is collected, or the ball drains. When the mode times out, the multiplier carries over to the next Pteranodon Attack, but not the award value. (Note: the timer will not pause in the pops nor during game stoppages such as mode introductions.) As of 1.10, if you drain while Pteranodon Attack is running, your multiplier does reset to 1x.
Completing Fossil Set 1 will add +10x to the next Pteranodon Attack value instantly! And collecting a Pteranodon Attack award of 50M+ will award a wildcard Fossil.
Loop Awards:
Loop shots count-up to various awards throughout the course of the game:
- 3, 13, 23, etc.: Qualifies Super Supply Drop
- 8, 18, 38, etc.: Increasing points
- 28: Wildcard Fossil
If the Triceratops has been captured, then awards are scored every 4 loops instead of 5. This perk affects ALL increments of awards going forward.
Tower Awards & Super Tranquilizer:
Side ramp shots also count-up towards various awards throughout the course of the game:
- 5: 3M
- 10: 5M
- 15: Light Control Room
- 20: 15M
- 25: Wildcard Fossil
- 35, 45, 55, etc.: 15M
Each award scored off of the side ramp also qualifies the Super Tranquilizer at the action button. When the action button is lit green in a Paddock, it can be pressed to momentarily stun the dinosaur. The Super Tranq must be requalified after a single use.
Making an upper loop - side ramp combo awards 3x the side ramp points and counts as two side ramp shots.
Amber Bonus:
The bumpers build your Amber Bonus throughout the entire game. Collect the Amber Bonus at the lit pops standup, which is lit by going through the rollover above the pops. Collecting the Amber Bonus does not reset it – it will relight and continue growing from the prior collected value. Capturing dinosaurs adds multipliers to your next Amber Bonus collect with a bonus +1x for Perfect Paddocks, which stack until collected. The current Amber Bonus is also collected during end-of-ball bonus – thus, any built Amber Bonus multiplier is used when your ball ends, and does not carry to the next bal – and can be repeatedly collected during the first four Super Supply Drop awards.
Completing Fossil Set 3 will add a 10x multiplier to the next Amber Bonus.
Supply Drop & 2x Scoring
Shoot the flashing blue targets to light the Supply Drop target for a mystery award. If Super Supply Drop is lit, that award takes priority. Collecting either type of Supply Drop lights the “Light 2x Scoring” standup to enable double scoring for 45 seconds.
Possible Supply Drop awards:
- Add-A-Ball (first Supply Drop during Feed T-Rex or Raptor Tri-Ball)
- Advance CHAOS
- Advance MAP
- Light Advance Paddock
- 5M
- Max Spinner (light all inserts)
- Double Nedry Value
- Spot Rescue
- Set Trap
- Call Helicopter
Super Supply Drop:
Qualified at the Supply Drop target after 3 (+10) Loops have been collected, or via the Smart Missile award. Collected via same target as a normal Supply Drop, but flashing instead of solidly lit, and takes precedence over normal Supply Drops.
(note: Only 1 super supply drop can be qualified at once, so make sure to collect it before reaching the next treshold)
| # | Award | Loops | Min. Loops w/ Triceratops Perk |
|---|---|---|---|
| 1. | Amber Frenzy #1 | 3 | 2 |
| 2. | Amber Frenzy #2 | 13 | 10 |
| 3. | Amber Frenzy #3 | 23 | 18 |
| 4. | Amber Frenzy #4 | 33 | 26 |
| 5. | Goat Mania (if logged in, otherwise the next supply drop is awarded) | 43 | 34 |
| 6. | Extra Ball | 53 | 42 |
| 7. | Super Escape | 63 | 50 |
| 8. | Collect 3x Bonus | 73 | 58 |
| 9. | Super Inlanes (Inlane awards qualified for remainder of ball) | 83 | 66 |
-
Amber Frenzy: The first four Super Supply Drop awards are timed Amber Frenzy modes given in a random order, where you can repeatedly collect your Amber Bonus by making certain shots:
- Amber Pops: 20 seconds
- Amber Slings: 30 seconds
- Amber Targets: 40 seconds
- Amber Ramps: 50 seconds
-
Goat Mania: For 40 flips, all Amber Frenzy features are running and every Amber switch triggered plays a goat sound. If the topper was installed, this can also be started by spelling JURASSIC PARK on the topper with successful Paddock completions.
DNA Combos:
There are 11 unique DNA Combos that will award:
- Points (1M point base value) and boost value of all other combos.
- 400K points per unique DNA Combo in bonus.
- At 6 Combos: Light Extra Ball (required amount is configurable)
- At 11 Combos: Wildcard Fossil
Combo logic:
- A combo is broken when a wrong lane is hit or a target/bumper is hit.
- Draining or hitting a slingshot will not break the active combo
- The helicopter switch is ignored for a short time after each ball launch.
- A combo has no time limit.
- A new combo can only be started after the previous combo is completed or broken. (ie. hitting the amber target directly after the spinosaurus combo will not award the Triceratops combo)
| Combo Name | Shot 1 | Shot 2 | Shot 3 | Shot 4 | Shot 5 |
|---|---|---|---|---|---|
| Gallimimus | Spinner | Truck | |||
| T-Rex | Spinner | Tower Ramp | Truck | ||
| Compsognathus | Spinner | Tower Ramp | 2x Playfield Target | ||
| Stegosaurus | Spinner | Upper Loop | Supply Drop Target | ||
| Spinosaurus | Spinner | Upper Loop | Tower Ramp | Helipad Ramp | Left Ramp |
| Triceratops | Left Ramp | Amber Target | |||
| Brachiosaurus | Left Ramp | Right Ramp | Supply Drop Target | ||
| Raptor | Left Ramp | Helipad Ramp | Raptor Target | ||
| Ankylosaurus | Helipad Ramp | Control Room | |||
| Spitter | Helipad Ramp | Left Ramp | Right Loop | ||
| Pteranodon | Helipad Ramp | Left Ramp | Right Ramp |
6-Way Combo:
There are 6 unique shots that can be shot in any order to award 2/3/4/5/6-way combos:
- Spinner
- Upper Loop
- Tower Ramp
- Helipad Ramp
- Left Ramp
- Right Ramp
Combo is logic is the same as for DNA Combos, but they are handled separately (breaking a DNA combo will not break the 6-way combo)
The red flasher on the right side of the playfield will light up to indicate that a 2-way combo has been hit. It will then stay on until the 6-way combo is completed or broken.
The base value for a 2-way combo starts at 250K (+50K for each DNA Combo)
| combo | multiplier | 0 DNA combos | 11 DNA combos |
|---|---|---|---|
| 2-way | 1x | 250K | 800K |
| 3-way | 2x | 500K | 1.6M |
| 4-way | 8x | 2M | 6.4M |
| 5-way | 20x | 5M | 16M |
| 6-way | 40x | 10M | 32M |
| Total | 71x | 17.75M | 56.8M |
Scoring a 6-way combo will also award a Fossil
Trifecta Award:
Bonuses are awarded for capturing dinosaurs and acquiring their respective fossils and DNA strands, with additional bonuses for collecting their respective Perfect Paddock awards.
Outlanes:
- Escape: The far left Light Escape standup is lit via the rollover at the top entrance to the pop bumper area. With default settings, this is initially lit for 20 seconds, and if claimed within that time period, will light the Escape virtual ball save in the left outlane. The Light Escape 20 second timer decreases by 4 seconds each subsequent time it is lit, down to a minimum of 6 seconds. One of the Smart Missile and Super Supply Drop awards is “Super Escape”, which lights Escape for the rest of the ball (specifically, the escape target when the ball save is not lit).
- Nedry: If lit, a system malfunction will save balls that drain down the right outlane. Light it by hitting the Lite 2x Scoring standup enough times (3, 15, or 30) - progression won’t resume until it has been used. The right outlane also scores a small bonus that increases upon further shots to the 2x Scoring target.
Extra Balls:
Six Extra Balls can be collected in this game, through the following methods:
- Lights Extra Ball at the right ramp:
- Score 6 Rescues
- Collect 6 DNA combos (operator-adjustable)
- Instantly awards Extra Ball:
If Extra Balls are set to points, they score 15M (which can be doubled).
End-of-Ball Bonus:
Bonus is based on your performance cumulatively throughout the game, and not just that ball.
Add up the following:
- Amber Bonus (base value only)
- Rescues x 150K
- Dinos captured x 500K
- Fossils x 2M
- DNA Combos x 400K
Then multiply by Bonus X, if applicable, earned from either Super Predators or cumulative Rescues.
Fossils:
11 collectible Fossils, divided into four separate sets, representing significant achievements throughout the game. Bonus awards 2m per Fossil collected. Doing well on certain objectives will spot a particular fossil. Collecting a set of fossils also gives a huge award.
| Set | 1 | 2 | 3 | 4 |
|---|---|---|---|---|
| Brachiosaurus | Velociraptor | T. Rex | Compsognathus | |
| Complete your 1st T-Rex Event | Complete your 2nd T-Rex Event | Complete your 3rd T-Rex Event | Win Museum Mayhem | |
| ────────── | ────────── | ────────── | ────────── | |
| Gallimimus | Triceratops | Pteranodon | ||
| Complete your 1st Control Room mode | Complete your 2nd Control Room mode | Win Visitor’s Center | ||
| ────────── | ────────── | ────────── | ────────── | |
| Ankylosaurus | Spinosaurus | Dilophosaurus | Stegosaurus | |
| Collect a Raptor Super Jackpot | Collect a letter jackpot in phase 2 of CHAOS multiball | Complete your 3rd Control Room mode | Win Secure Control Room | |
| ────────── | ────────── | ────────── | ────────── | |
| Set Award | 20M and +10x Pteranodon Multiplier (one time only) | 35M and Extra Ball | 100M and +10x Amber Bonus (one time only) | 250M and +10 Rescues |
In addition, collecting all eleven fossils also awards 500M!
There are also seven “wildcard” Fossils hidden throughout the game. A wildcard Fossil will spot any fossil in the lowest available “set” it can, and furthermore, any wildcard Fossil spotted will negate the opportunity to collect that Fossil normally. These Fossils are available from:
- Smart Missile (choices 3 or 4 might be “Fossil”)
- 6-Way Combo
- 30 Rescues (less if you have the Ankylosaurus “Easier Inlanes” perk)
- 25 tower shots
- 28 Loops (less if you have the Triceratops “Easier Loop Awards” perk)
- Collect a 50M+ Pteranadon Attack shot
- Collect all 11 DNA Combos
Wizard Modes:
Three mini-wizard modes exist - play all three wizard modes to qualify Escape Nublar. Completion of all of these mini-wizard modes is a requirement for the ultimate final wizard mode. You only get one attempt at each mini-wizard mode, so make them count!
Visitor’s Center:
Mini-wizard mode for reaching the Visitor Center by navigating the Paddocks, lit at the left ramp in the same way as the Paddocks by shooting the white arrow shots.
Before starting this mode, a bonus is immediately awarded based on the quality of performance and difficulty of the path you took to get to the Visitor’s Center. The bonus is calculated based on quantities of the following:
- Fossils collected (5M)
- Rescues (750K)
- Longest Rescue Streak (1.5M)
- DNA Combos collected (2.5m)
The total of the above is then multiplied by the number of Paddocks visited, and is not affected by 2x scoring.
Two-ball multiball then begins, with a generous ball save. The raptors have invaded the Visitor’s Center’s kitchen and must be locked into cold storage. The two rightmost shots are lit (‘O’ and ‘S’) to lure the two raptors into cold storage. Making either shot advances the two lit shots one position to the left; the shot base value starts at (2 * paddocks visited) million, increasing by a flat 1M each time. If you take too long to make a shot, the shots will drift one position back to the right. Also worth noting is that hitting a repeat shot that drifts back is worth half of what that shot was worth last time (and then half of that, etc), making “grinding” easy jackpots a waste of time.
When the shots reach the Raptor Pen, only the back target of the pen will be lit. Shooting the Raptor Pen will stun the Raptor, lock that ball, and serve another ball. The next shot will then be the ‘C’ lane which will do the same. Both of these shots score (4 * paddocks visited) million. A hurry-up will then start counting down from (8 * paddocks visited) million. Using either of the two new balls, knock either of the locked balls to lock a Raptor in cold storage, freeing that ball and awarding the hurry-up value (on the Pro, the Raptor Pen cannot trap balls; simply hitting the Raptor Pen is enough to count). The hurry-up then continues counting down. Lock both Raptors in cold storage before the hurry-up expires to win the mode and start a “Victory Targets” mode for 1M (+250K) per target hit until multiball ends. Shoot every flashing target on the playfield to light the control room for a jackpot and add-a-ball, at which point all targets relight. After draining out of Victory Targets, the Pteranodon Fossil is awarded.
If you drain down to one ball but haven’t yet reached the Raptor locks, the mode does not end yet. Once you make the first Raptor lock shot, you must complete the raptor locks while in multiball to win the mode and play Victory Targets.
Museum Mayhem:
Play through all four T-Rex Events, then spell T-Rex at the truck once more to light the left ramp for Museum Mayhem.
The mode starts in single-ball play. The T-Rex must put an end to the raptors who have been terrorizing the park. Two green shots, representing raptors, move across the playfield; one starts at the right orbit, the other starts at the left ramp. These shots move one shot over to the left after about 5 seconds; if the Control Room is lit, it’ll move over to the Helipad after enough time has passed without shooting it. The shots will move even if you’ve cradled up, so take your time to wait for shots that you’re good at hitting. Nailing the first raptor will score 5M and then light the center Raptor Pen target to score 10M. Hitting this target will then light the left ramp to allow the T-Rex to kill the raptor for 20M. (On the Premium / LE, the T-Rex will throw the ball in a random direction during this mode if the left ramp is lit.)
After defeating both raptors this way, the truck will light for 10M. Making the truck will then light the left ramp for 75M and allow you to escape the museum! A 3-ball Multiball will then start, where all shots are lit for victory Jackpots starting at 3 million (+250K) a shot. After draining out of the victory multiball, the Compsognathus Fossil is awarded.
Secure Control Room:
After playing all three Control Room modes, shoot the control room shot again to begin Secure Control Room.
In this single-ball mini-wizard mode, raptors are peeking inside the control room, and they want in! The mode begins with one shot lit for a hurry-up. Collecting it will start a new hurry-up on a different shot, with a higher value than the prior one. Repeat until you’ve collected a hurry-up from all major shots to light the control room lane for the sum total of all hurry-up collects, finishing the mode and awarding the Stegosaurus Fossil.
Whenever a new hurry-up lights and the final control room shot isn’t lit, all of the shots you’ve previously collected hurry-ups from will light green for one shot; shooting a green shot will add 5 seconds and slightly build the value of the current hurry-up.
The shot order is fixed as follows:
- Left ramp
- Right ramp
- Tower ramp
- Right orbit
- Upper loop
- Helipad
- Pops target
- Control room
Escape Nublar (Wizard Mode):
After playing all three of the above wizard modes, shoot the left ramp to start Escape Nublar. The goal of Escape Nublar is to navigate back through the Paddocks to the main gate, while rescuing any remaining staff and dinosaurs, before the volcano erupts. This is a single-ball wizard mode where you have three “balls” (trucks) to complete the mode. Tilting counts as an immediate mode loss, and thus, ends your game - however, your supply of tilt warnings is replenished when you lose a truck. Each Paddock consists of two phases.
- Rescue Phase: This consists of collecting rescues by hitting all the lit rescue shots for 500K x number of Rescues pre-Nublar + 1M x Rescue Streak, doubled by the center Raptor Pen target. Unlike Paddock mode behavior you see in the rest of the game, what you see is what you get: once you shoot all the lit Rescues, that’s it. There will not be additional Rescues that continue popping up after shooting the last lit Rescue. Once all lit rescues have been collected, if you have not captured that Paddock’s dinosaur during normal gameplay, you will need to hit the Set Trap targets to rescue the dinosaur from that paddock. If you had already captured the dino in that Paddock, this part is skipped. Also, there will be more lit rescues you have to collect if you’re visiting a Paddock you didn’t visit during normal gameplay. Turning the truck during rescue phase shifts all remaining rescue shots one to the left/right.
- Navigate Phase: After collecting all Rescues (and the dinosaur, too, if applicable), this phase requires you to find a safe exit from the paddock. Several red arrows are lit, which may or may not expose a safe opening out of the paddock. If the path is blocked by lava then you must find another path by shooting additional red arrow(s). There is no indication beforehand whether a path will work or not; you just have to shoot one and hope for the best. The further you are into the mode, the more likely it is you will hit a bad path. When a safe path is found, the left ramp will light up to advance to the next paddock. The truck direction dictates which paddock you will navigate to next, and you can change this at any time before shooting the ramp.
- Sudden Death: If your truck runs out of fuel (and time has run out), Sudden Death begins. All remaining lit rescues are lost, as well as the opportunity to capture the dino (if applicable), and you have 15 seconds to leave the paddock before it becomes engulfed and that truck is lost. If you were in the Rescue Phase, you go straight to the start of the Navigate Phase, otherwise you simply continue the Navigate Phase as before. There is no way to add fuel during this phase. If you successfully exit the Paddock in time, your truck is refueled, you proceed to the next Paddock, and your Rescue Streak remains intact.
- Helipad Hurry-Up: Navigating back through the main gate lights the Helipad hurry-up based on number of rescues, dinosaurs captured and number of paddocks cleared. Shoot the Helipad to escape the island. You will also collect a large “island bonus” based on how many paddocks were covered overall, ranging from about 125M to 550M. Win or lose, after this mode is played, your GAME ENDS regardless of whether you were on your last ball (unless you’ve qualified When Dinosaurs Ruled the Earth, but then your game ends after that.)
When Dinosaurs Ruled the Earth (Ultimate Wizard Mode):
Secret super-wizard “epilogue” mode awarded for successfully completing Visitor’s Center, Museum Mayhem, Secure Control Room, and Escape Nublar.
Timed 6-ball 60-second multiball with unlimited ball save. All Amber features are running (scoring 1/2 your Amber value) and all shots are lit for jackpots of roughly 1.5x your Amber value, which should be huge by this point in the game. When time runs out, all balls are drained and your GAME ENDS.
Competition Install Notes:
- Escape is not lit at the beginning of the game.
- Feed T-Rex is not fixed as the first mode, and won’t start with the captive ball hit that awards “X” in T-REX.
- Amber awards from Super Supply Drops are deterministic (pops first, then…?).
- Invalid Frenzy can’t be chosen as a Smart Missile award.
