GNR Rule sheet
V1.20
Starting Songs
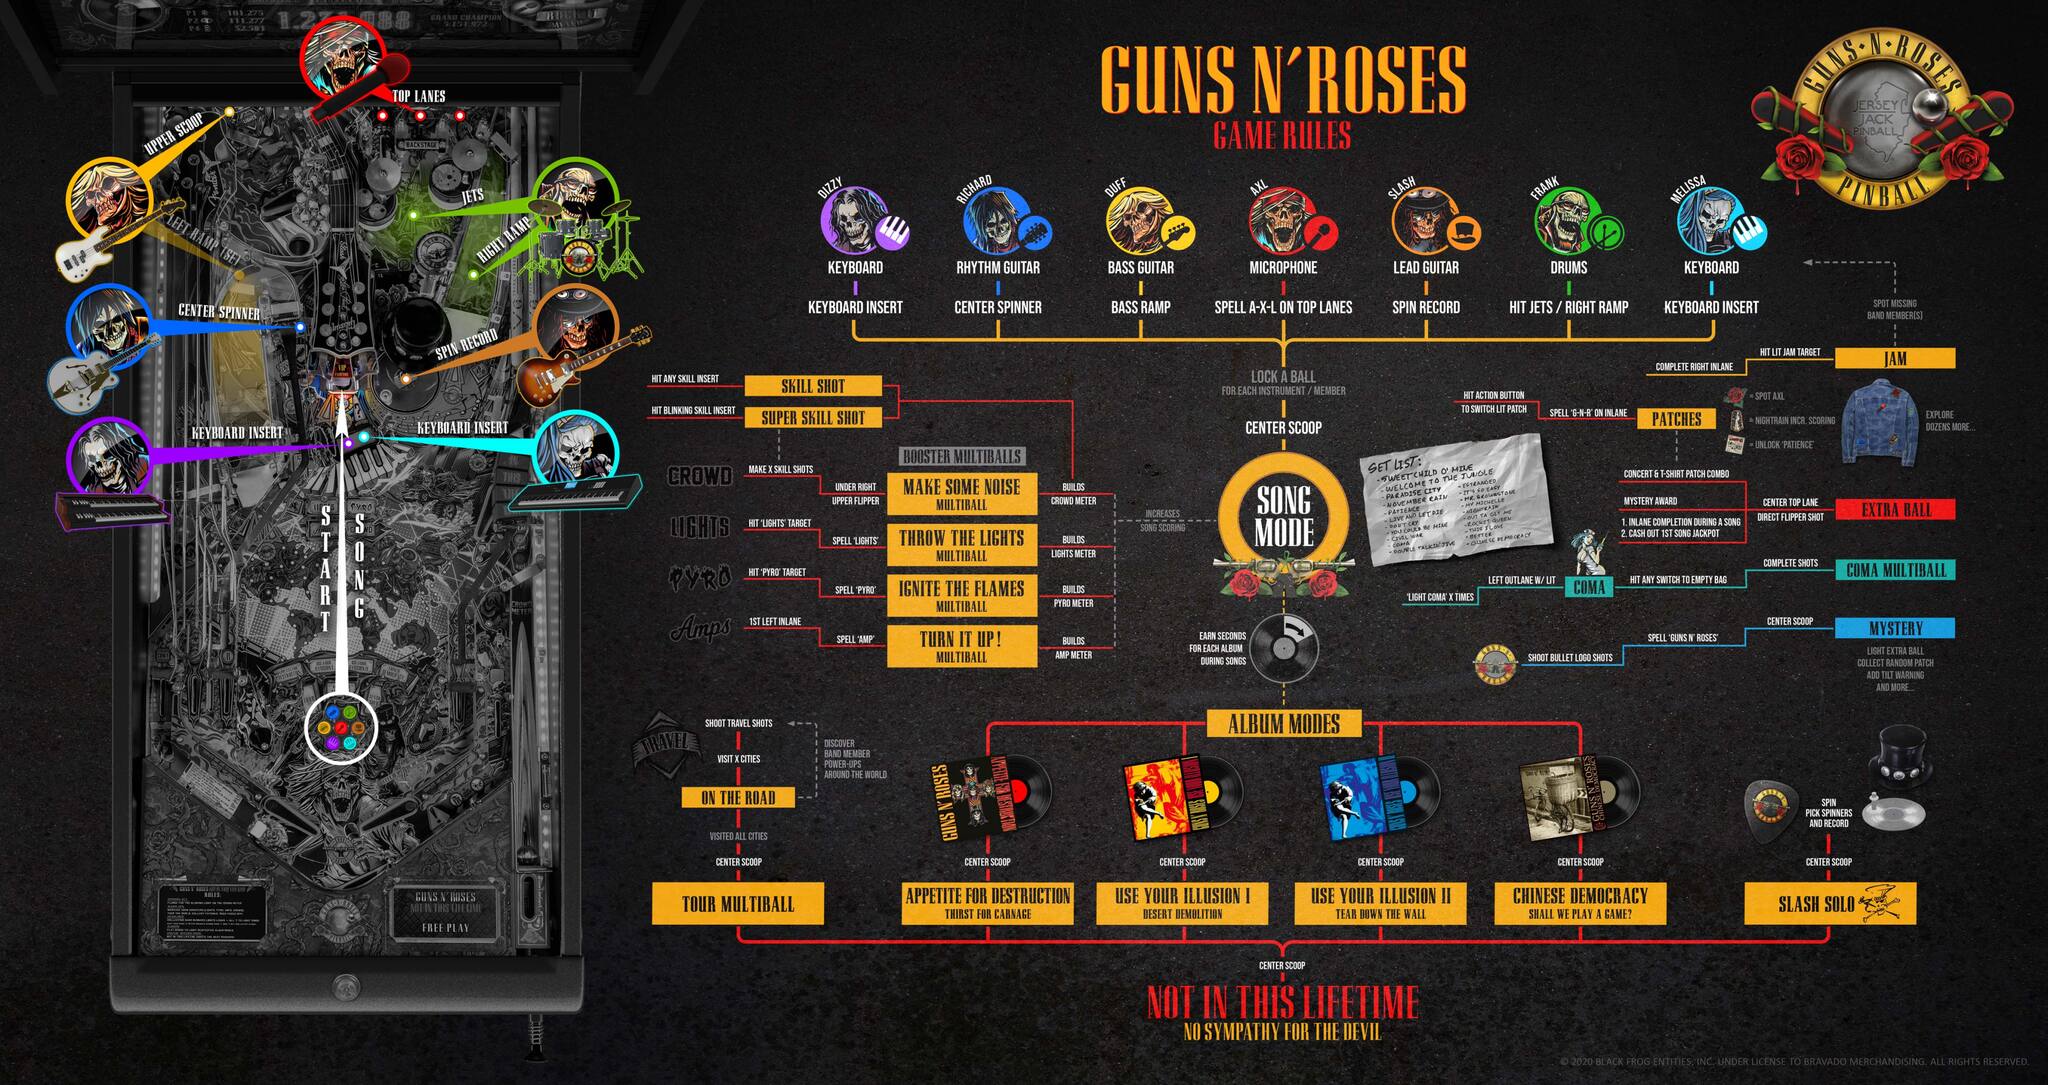
The main objective of JJP GNR is to collect your seven band members and start a song. Certain shots on the playfield correspond to the different members. Once a member has been collected, a ball can be locked by shooting the left ramp. Collect all seven band members, then shoot the center scoop to start a song.
Collecting Band Members
Collect each band member by shooting their corresponding shot on the playfield a certain number of times.
- Axl - Spell A-X-L on top lanes. The playfield LCD will assist in indicating which letter is selected.
- Slash - Spin record a certain number of times. Spinning the record also eventually qualifies Slash Solo mode.
- Duff - Shoot the left ramp enough times. On the LE/CE this is the VUK that feeds the bass wireform. This is usually hit with the mini upper playfield flipper.
- Richard - Shoot the center spinner just to the left of the center scoop enough times.
- Melissa - Roll over the teal keyboard insert below the center scoop enough times.
- Dizzy - Roll over the purple keyboard insert below the center scoop enough times.
- Frank - Hit the jets or right ramp.
Each band member is represented in the revolver inserts in the middle of the playfield just above the flippers. When the band member inserts turn from flashing to solid, you have qualified them.
Spelling J-A-M at the right inlane lights the JAM target to the left of the scoop for a short time. Hitting the JAM target will collect between 1 to 6 missing band members, depending on whether the player shoots the left orbit before hitting the target, and how quickly the player shoots the target.
Locking Balls
After a band member has been collected, a ball can be locked either at the lock shot (LE) or by shooting the left ramp twice (Pro). Locking all 6 balls will start the currently selected song automatically, so be careful. The number of locked balls increases your song’s starting value and increases the song ball save time.
Song Selection
When a song is qualified, the corresponding Album insert will be lit white and the name of the song will display on the playfield LCD. The song can be changed by hitting one of the 4 album standup targets next to the ramps (from left to right: Appetite for Destruction, Use Your Illusion I, Use Your Illusion II, Chinese Democracy). The player also has the ability to change the song by hitting the action button right before the song starts. If the song is manually chosen this way, you will lose 15 from the song level, so take what the game gives you if you’re hoping to score big points. Once a song is played, it can’t be replayed.
Booster Multiballs
Starting a Booster Multiball can make it easier to collect band members, lock balls, and advance towards starting the song; and will also advance the song level if you do well enough.
Each Booster Multiball can be played once each before a song is started; if their corresponding inserts are flashing, they can be started, and if they are solidly lit, they have been maxed out. After the Booster Multiball has been played, it is still possible to max it out by hitting the corresponding shots that started it.
- Make Some Noise Multiball – Blue: Spell NOISE by making Skill Shots, then shoot under the upper right flipper when “Noise” is lit to start the Multiball. Two shots are randomly selected; shoot them both to light the super jackpot under the upper right flipper. Each jackpot adds lights to the Noise meter; the more lights that are lit when the player shoots it, the larger the super jackpot value.
- Throw the Lights Multiball - Purple: Hit the Lights target on the upper playfield (LE/CE) 3 times in a row, or make successive shots to the left ramp (SE) to start the Multiball. Shoot the left and right ramps to light the Jackpot on the upper playfield. Combo ramp shots to light it quicker.
- Ignite the Flames Multiball - Red: Hit the Pyro target behind the spinning record four times to start the Multiball. Hit a certain number of switches to start a timed jackpot collect on the LCD display. All inserts turn red and the shaker will go off to indicate to the player that this is available. A fuse is moving across the screen and single, double, or triple jackpot will be awarded based on when they press the action button. Qualify more jackpots by hitting more switches.
- Turn it Up! Multiball - Yellow: Complete A-M-P at the far left inlane to start the Multiball. Two hurry-ups are lit at the start of this Multiball. Complete the hurry-ups to light jackpots at the major shots.
Song Scoring
Each song has several stages that are completed by hitting lit shots or a certain number of switch hits. Once the stage is complete, the center scoop flashes green / white. You must hit the center scoop to progress to the next stage of the song; while in Multiball play, doing this will add-a-ball and move on to the next stage. The song progress and lit shots are indicated on the playfield LCD. As you progress through the stages of the song, the song jackpot increases.
In single ball play, hitting the scoop when the stage is complete presents a choice to the player: Take the Song Jackpot and stop the song (action button), or continue to the next stage of the song and add a ball. When you continue, there is no additional ball save, so be careful. Each stage of the song exponentially increases the value of the song’s scoring and the song jackpot.
Song Level
The scoring for each song is impacted by the Song Level, which is determined during single-ball play. The Song Level for each Song starts at 10 and seemingly has no limit. The Song Level resets to 10 once the player ends a song without collecting Encore.
There are various ways to increase the Song Level:
- Start the song that the game gives you - +15
- Collect the patch associated with a song - +30
- Collect super jackpots during Booster Multiballs - +50
Rock-It Meter & Encore
The Rock-It Meter discourages controlled play, but can lead to even higher Applause Jackpots if the player maintains it. As you make the lit shots during a song, the Rock-It Meter increases; it decreases if the player fails to make lit shots, and decreases very quickly if they cradle a ball. If the meter reaches zero, the crowd will boo you off stage and the song will end early, returning to standard single-ball play.
If you complete a song with the Rock-It Meter full, an Encore is awarded, and the next song in the current album will play with the Song Level, scoring, and balls that were locked before the first song carrying over to the next song. You do NOT need to earn an Applause Jackpot to get an Encore, and multiple Encores can be collected in a row.
Power Chord Award
If multiball is active during a song, the player can re-lock balls on the upper playfield to collect bonus points. Once each ball has been locked, a 20-sec timer starts to lock another ball. The Power Chord values are as follows:
2 ball - 100k
3 ball - 250k
4 ball - 500k
5 ball - 1M
6 ball - 2.5M
A successful Power Chord will add a ball into play and release all the locked balls back into play. If you lock every ball but one in the guitar, and drain the ball in play, you’ll get a small award for the locked ones 10k per ball locked 50k) and they will be released. You cannot score the same power chord twice in the same song.
Band Frenzy
Inserts corresponding to certain band members are lit at different points during each song. Shooting the corresponding band member’s shot will boost the band member and increase the Rock-It Meter. Repeating this process for every member will start a Band Frenzy that increases the Song Jackpot for every switch hit.
Applause Jackpot
Shoot the scoop during the last 10 seconds of a song to score the Applause Jackpot, worth the built up song jackpot. If you don’t collect the Applause Jackpot, your song jackpot is lost, even if you don’t drain. After collecting the Applause Jackpot, if the Rock-It Meter is full, an Encore will be awarded; otherwise, the player will return to single-ball play.
Song Rules
Appetite for Destruction
This album has the highest number of songs. Some are fairly difficult to make progress in but others can be high-scoring. (It’s So Easy and Mr. Brownstone are removed on family settings.)
- Welcome to the Jungle: (4:31) Lots of shots are lit at a time. Starts off with most of the shots lit. Next wave switches to loops, but when you hit one, the shots switch to targets. Midway through the song, only the inner loop shot will be lit (the right ramp detour doesn’t work for this). At the end of the song, alternate between shooting all shots, then targets, loops, ramps, then just the coma target.
- It’s So Easy: (3:21) High-scoring shot frenzy mode, best played with a multiball. Every shot is lit, and making 10 shots will complete the wave. Each shot can only be collected once per wave; they relight once you advance to the next wave.
- Nightrain: (4:26) Ramp / top lanes focused song. First wave - shots alternate between both ramps to the four album targets. Second wave - only the AXL lanes are lit. Third wave - ramps, fourth wave - AXL lanes again. Good mode if you want to progress Power Chord.
- Out ta Get Me: (4:20) Alternating shots song. The loop, ramp, and targets on the left side of the playfield are lit first; they alternate with the corresponding shots on the right side of the playfield as you progress through the song. Waves don’t have any impact on the shots’ positions.
- Mr. Brownstone: (3:46) Shoot the center spinner to light two or three major shots, shoot one of the shots that lights, and then shoot the center spinner once more until you complete the wave. Early on these shots are the left loop, left ramp, and center scoop.
- Paradise City: (6:46) All orbit shots divert to the top lanes during this song, to allow the ball to enter the pop bumpers. Collecting enough bumper hits lights a major shot, and subsequent bumper hits will light other shots. If nothing is lit, shoot the bumpers and they’ll give you something to shoot for. Repeat for each wave.
- My Michelle: (3:39) Two shots light to score hurry-up points, moving clockwise to the tempo of the song. Shoot them enough times to complete the wave. Rinse and repeat. A simple song but one that can be very elusive if you make the right shots quickly.
- Sweet Child o’ Mine: (5:55) Alternate shots between the loops and ramps. Shoot either loop first, then shoot either ramp; as you make each shot they will alternate between one side on the other. The scoop also sometimes lights. Like Nightrain this is good for advancing Power Chords, arguably better because of the lack of top lane shots.
- Rocket Queen: (6:13) Make shots from left to right, then right to left. This song uses the two loops, two ramps, and the center spinner. At the start of the song, the left loop is lit; keep making shots from left to right, then advance to the next wave, where shots will start at the right loop.
Use Your Illusion I
Less songs than Appetite for Destruction but they have a mix of lengths, ranging from just about 3 minutes to over 10 minutes. (Double Talkin’ Jive is disabled on family settings.)
- Live and Let Die: (3:04) Lots of shots but not a lot of time. Shoot the four targets followed by the center spinner in the first wave, then the ramps / loops then center spinner in wave 2, and finally, all 8 of the listed shots followed by the center spinner for the final wave. If you’re new to playing songs this is a good one to start with due to the short length.
- Don’t Cry: (4:44) Every two waves, the shots change. During the first two waves, shoot the left ramp and the two targets on the right; during the third and fourth waves, right ramp and the two left target. Halfway through the song the other standup targets will light and you’ll have to shoot these to progress. Shots deactivate as you approach the end of the song.
- Double Talkin’ Jive: (3:23) Similar to My Michelle but the targets move at a slower pace, though you also have about a minute less to score compared to that song, so plan accordingly.
- November Rain: (8:57) Frenzy-based song. Every wave, more and more switch hits are required to light the scoop to advance to the next wave, making it more difficult to complete the entire song. Your best bet to score high during this song is to maximize the Song Level right before starting it, or play another song before it. Clocking in at 9 minutes this can lead to big scores.
- Coma: (10:13) Longest song in the game; alternate between making the major flashing shots, and shooting the Coma standup target. The right ramp detour will activate during this mode, to make shooting the target easier. Don’t expect to make it all the way through.
Use Your Illusion II
Just three songs, but two are on the long side.
- Civil War: (7:42) The upper loop is constantly lit during this song, as well as one of the major shots (either ramp or loop). Waves don’t affect which shots are lit, they move over the course of the song. If you can shoot the upper loop consistently this can be high-scoring.
- Estranged: (9:23) Over the course of the song, the shots alternate between two states; the loop / ramp inserts are roving between shots and all four targets are lit, or the targets are roving between shots and all major shots are lit. The first state is active at the start of the song.
- You Could Be Mine: (5:43) Only one shot is lit at a time during each wave, and you have to make the lit shot enough times to qualify the next wave. Sometimes the game will give you a shot you can make easily, other times not; put up with the risk and try to make it to the end.
Chinese Democracy
Another three song album, but this one is generally more manageable as both songs are around 4 to 6 minutes in length. The first two songs are fairly easy to get a Band Frenzy during.
- Chinese Democracy: (4:43) Shoot everything! All the major shots are lit during this mode, and all will eventually qualify the next wave after enough shots have been made. Starting at about halfway through the song, the shots will unlight when they have been made, making it slightly tougher to advance.
- Better: (4:58) Two shots are lit at a time over the course of the song, unaffected by waves: left loop / ramp, right ramp / loop, and center spinner / upper loop. Halfway through the song, the record will be the only shot lit to advance.
- This I Love: (5:34) The ramp, loop, and targets on the left side of the playfield alternate with the corresponding shots on the right side of the playfield to the tempo of the song.
Album Modes
Time spent playing songs helps qualify the respective Album Mode for each album. 3:00 worth of songs from an album being played is the bare minimum required to qualify the the Album Mode (and a silver record). Gold and Platinum Albums can be earned by playing more songs from the same albums, and increase scoring during the Album Modes. All Album Modes have completion bonuses based on how quickly they are completed.
Album Mode Rules
The four Album Modes are:
- Thirst for Carnage (Appetite for Destruction) - Hit the dirty robot by making lit shots; once a lit shot has been made, you can repeat the same shot up to three times to deal more damage. Once the hurry-up timer ends or the player makes all three shots, the major shots will relight. Additionally, you can shoot the green flashing targets to charge up the Power Hit Meter, and press the action button when qualified a more powerful attack. The faster you destroy the robot and press the action button to end the mode, the larger the completion bonus.
- Desert Demolition (Use Your Illusion I) - Wipe out all 7 band members and win the race. The red racer on the display represents your current position in the race; whichever band member the racer is closest to will light their corresponding shot to wipe them out. Remember to use the action button to accelerate to prevent entering last place; switch hits will also build the turbo meter for an even larger boost. Wipe out all 7 racers to win.
- Tear Down the Wall (Use Your Illusion II) - Six major shots on the playfield each correspond to a poster on the wall, seen on the display, from left to right. Shoot the record spinner to move the cannon depending on the direction of the record shot; when the cannon reaches an undamaged poster, press the action button to destroy it for points. Shooting lit shots corresponding to undamaged posters increases their multipliers for when the cannon is ready; shooting a damaged shot will place another poster there and force you to shoot it again.
- Shall We Play a Game? (Chinese Democracy) - The POPR computer decides you’ve had enough and shuts down the game. Give the computer a taste of your mind by shooting the blue / white shots to advance through the mode, scoring additional points for completing the streak; while avoiding the red / yellow shots, as these will break the streak. The longer the streak, the easier it is to finish the mode.
Patches
Collect Patches by spelling G-N-R on the left inlane, or by draining from the upper playfield on the LE. Each patch has its own benefit(s), and can be selected at any time until collected by pressing the action button; once you leave it on a patch, you will always be going for that patch until you collect it. You can also hold the left flipper and hit the action button to go back if you skip a patch. The patch benefit is displayed in the playfield LCD. All three inlanes can be cycled to move the GNR letters over.
| Patch | Benefit |
|---|---|
| Lighter | Album Sales Scoring Increased |
| Melissa’s Candy | Spots Melissa’s Tour Item |
| Semi Truck | +15 Song Level for You Could Be Mine |
| Chinese Democracy Album | +1 Streak Break Protection for Shall We Play a Game? |
| Firecracker | Easier Action Button Jackpot for Ignite the Flames Multiball |
| Rose | Axl Spotted Rest of the Game |
| Axl’s Mic Fuzzy | +15 Song Level for Better |
| Slash’s Top Hat | Increase Record Spin Scoring |
| Gun | Increase All Patches’ Scoring |
| Bra | Increase Skill Shot Scoring |
| Amp | Longer Hurry Up Timer for Turn it Up! Multiball |
| Use Your Illusion I Album | Increased Scoring for Desert Demolition |
| IV Bag | Increase Timer for Coma Ball Save |
| Train | +15 Song Level for Nightrain |
| Underwear | +1 Coma Target |
| Fender | Shooting Active Band Members Spots Other Members |
| T-Shirt | Additional Tour Item the Rest of the Game |
| EKG | Increase Ball Saver Time for Coma Multiball |
| Condom | +15 Song Level for Rocket Queen |
| Gibson | Slash Spotted Rest of Game |
| Poster | Increased Timers for On the Road |
| Vater | Frank Spotted During Songs |
| Duff Skull | Duff Spotted During Songs |
| Guitar Pick | 3x Record Spins for Slash Solo |
| GN’R Lies Album | Unlock Patience |
| Sunglasses | Advance Tour Cities |
| Marshall | Easier to Finish Slash Solo |
| Appetite for Destruction Album | Power Hit Meter Starts Half Full in Thirst for Carnage |
| Lights | Increased Combo Timers |
| Use Your Illusion II Album | Cannon Can Wrap Around in Tear Down the Wall |
| Bandana | Increase JAM Hurry Up Timer |
| Horn Hand | +2 Shots Lit for Make Some Noise Multiball |
| Airplane | +15 Song Level for Live and Let Die |
| Frank’s Drumsticks | Super Jets |
Patch Sets
Patch Sets are sets of like patches that can have even greater benefits.
| Patch Set | Benefit |
|---|---|
| Horn, Lights, Amp, Firecracker | Unlimited Booster Multiball Plays! |
| Gun, Rose | +15 Song Level for Welcome to the Jungle |
| Bra, Underwear | Double Bonus Rest of the Game |
| IV Bag, EKG | +1 Ball + Increased Scoring for Coma Multiball |
| Semi Truck, Airplane, Train | Increased Scoring for Tour Multiball |
| Vater, Marshall, Gibson, Fender | Light Extra Ball |
| Poster, T-shirt | Rock-It Meter Flipper Decay Halved |
| All 4 Albums | 2X Album Levels |
Mystery
Shoot the GNR Logos around the playfield to spell GUNS N ROSES. Once spelled, Mystery is lit at the center scoop. Mystery awards can be earned during Song Modes as well. The Mystery Awards can be very valuable, including:
- · +1 or +2 Tilt Warnings
- · Additional Ball Save
- · Award 1-3 Patches
- · Light Extra Ball
- · Award (x) Lock(s)
- · Start Song – This can be dangerous if the song isn’t boosted to your satisfaction.
- · Spot Band Member(s)
- · Points
Slash Solo
Spin the record a certain number of times, shoot the guitar lock. Shoot spinners. Repeat victory laps.
Cities / On the Road
Shooting the loops (left / right and inner upper flipper) will collect cities. The cities are indicated with the small inserts on the map in the center of the playfield. Hitting a certain number of cities starts On the Road a 20(?) second timed mode where the loops (orbits) are lit. During On the Road, you can discover band member “power ups”. Once all 53 cities are visited, you qualify Tour Multiball.
Tour Multiball
Two ball Multiball. Stand up targets on either side of both ramps will add-a-ball. Hit the loops to light jackpots and super jackpots. As of 1.08, this does not seem to be complete .
Coma Ballsave
Earn Coma ball save by hitting the Coma target multiple times. This lights Coma as the left outlane. When Coma starts, hit 100 switches to empty the IV bag. Once empty, two shots are lit. Hit those two shots to start Coma Multiball.
You have 40 seconds to complete.
Coma Multiball
Hit the lit shots for jackpots
Not in this Lifetime Wizard Mode
Spoilers
The mode is actually called “No Sympathy For The Devil”.
The mode is 120 seconds, fixed. It starts with a ball save that appears to end after 65 seconds?? The objective is to recover GnR’s instruments from the devil by shooting each band member’s shot twice while they are lit. The lit band member cycles every 15 seconds(ish?) or when a shot is made, a brief ball save activates when the band member cycles if the initial save has run out. While each band member’s shot is lit a special rule applies as follows.
| Band Member | Shot | Change |
|---|---|---|
| Axl | A-X-L lanes | Bumpers must be manually activated with action button |
| Slash | Disc | Flippers are reversed |
| Duff | Upper left ramp | Upper left flipper cannot be held |
| Richard | Lane to left of center scoop | Lower buttons can only be flipped with action button, both at once |
| Dizzy | Left hand Keyboard keys | Left lower flipper controlled by action button |
| Melissa | Right hand Keyboard keys | Right lower flipper controlled by action button |
| Frank | ? | “Right ramp diverter activates randomly” |
Both Dizzy and Melissa lose successful shots if the center scoop is hit without hitting the keyboard first.
Each successful band member shot is worth 5000 points. There also appears to be very frequent scoring (per switch?) of 10 points.
 This post is now a wiki for people to start.