Does anyone have any good tricks for leveling machines by yourself? When I do it, it’s sort of this Goldilocks thing of hoisting a machine on a lift, fiddling with the levelers, lowering the machine, retesting the level, repeat too many times until it’s right. There has to be a better way!
If you have two people it’s pretty easy. One person lifts, the other person screws whichever leveler you’re adjusting up or down a couple turns. the lifting person drops it and checks the level.
When I’m on my own I do basically the same thing. Lift with one hand, turn the wrench 360 degrees, drop the machine, check the level. You can also just turn the levelers without lifting the machine at all.
I think perhaps the distinction is using a wrench even if the levelers are free enough to move without one. It helps you keep track of how many turns you’ve done. It’s also an easy way to adjust the slope when the machine is already level. Just do the same number of turns on the right and left side. If you’re just turning the levelers without keeping track of how much they’re turning it’s pretty much just guess and check… and guess again.
I use an app called “Pinguy” to get mine leveled and sloped. It gives me voice commands so I don’t have to get out from under the game to check the “bubble”. I just have to let it settle for about 2 seconds between adjustments and I get my new reading. It’ll tell you what legs need adjusting and when they’re good. After everything is adjusted, I look at the screen and everything is set to the target slope. I like it pretty well… Anyone else use it?
-Steve
7 Likes
I usually crawl under the game and lift it up with my back while I mess with the leg levelers. Then crawl out and check. Feel the burn! Do not exceed more than two repetitions! Lol
6 Likes
Must be an apple thing, huh?
@PinballSTV, thanks for the tip on Pinguy… I’d never heard of that (nor thought to search for a pinball leveling app!) but it looks very cool… looking forward to trying it out on an actual game. (And yeah @Keefer, it’s iOS.)
And yeah, with two people it’s significantly easier than with one person, since you don’t have to crawl under and back out constantly.
There is a “Pinball Leveller” (sic) for Android that has the same speech cues that Pinguy does.
How bout a level thats accurate a reliable? I got one of the cheaper digilevels from amazon, the clear colored plastic ones. I leveled my games for a tournament and they still leaned to the left or right depending on which side of my garage they were on. Boooo level better!!!
Same with me. I use my back as it’s no effort at all and can adjust the back levellers very easily and then turn around and do the front’s. All before breakfast!
1 Like
I always calibrate the app to the floor directly underneath each game before I level them. We’re going to be moving here in a few weeks so I’ll have 4 games to get leveled up. Shouldn’t t take long.
-Steve
1 Like
I use my back also most of the time, but if I’m just doing minor adjustments on one leg, there’s a way to get down on one knee (like you’re proposing) and prop the game up using your thigh. It doesn’t require much strength to keep it resting on your thigh. It seems likely that being tall helps.
If I’m leveling the front, I lift the front, and slide a paperback book under the opposite leg that I’m going to level. Same goes for the back, but I level it before I put against a wall. No need to strain you back.
Some people also mark the floor with a felt pen / sharpie to show where the feet are. Then once it is levelled you simply need to move the pinball back to the original position again to get it level.
Some of my basics about leveling games. I’m very anal about game setup so I had to develop a good way to receive good results. First and most important rule when leveling a game is that it’s done always from the rear legs. I try to keep front leg levelers fully in to get most stable game possible, all what comes to pitch and sideway adjustments, it must start from back of the game. Procedure is about:
- Front levelers in, back levelers in same height.
- Put an spirit leveler in front of backbox
- lift games front legs off the ground just a bit, check where game is leaning
- fix from rear legs, test always lifting game up from the front
- When sideway level is ok, then lift game up and slowly put it back to down. Adjust front levelers so that both legs will touch the floor simultaneously. This is important part, front legs are giving the game stable “stance”
- if the pitch is too low/high, adjust rear levelers accordingly. And always test front leg adjustments by lifting and lowering it back.
Few notes. Some games don’t have playfield aligned 100% to cabinet. This can again be compensated and level can be corrected from the rear levelers. Why this way? It’s important that game cabinet is not twisted, playfield won’t be sitting there evenly and game is not playing right. Many of the feeds are affected etc., this is important in games which has some near-sdtm return feeds, like T2’s skull. If the playfield is in twisted cabinet, this feed can vary every time. Not an ideal situation if not meant to be this way. Also one thing where twisted cabinet is bad is nudging, it can be very easy to nudge from another way (sideways) but from another side game is rock solid because all the weight is on one leg.
I would like to kill off some myths if I may.
1
Spirit levelers are only a guidance and they are hard to use correctly. When used to cabinet or glass it might not give a reading that is true to the position of the playfield. And when used on the playfield it is hard to fit in place - and when that is achieved - it is hard to be sure it is placed perpendicular to the pitch. The top of the sling shots is not always alined.
2
An equally important goal of adjusting leglevelers is to make sure the game is standing firmly and equally on all four legs. And not just resting on three.
3
Play the game. If you believe it is playing as if having a lean. And/or some shot and returns are not working. Adjust for this to make the game play better and forget about the read of a spirit leveler.
1 Like
A friend has made a few of these gizmos for leveling pins. You stick the fork points under the leg (on either side of the leveler), and push the arm down to lift the machine with one hand while you turn the leveler with the other. I can post a video if folks care. No sore back/knees, and you can tweak to your heart’s content. Last year, I leveled 15 banks for PinBurgh in about 2.5hrs using one of these.
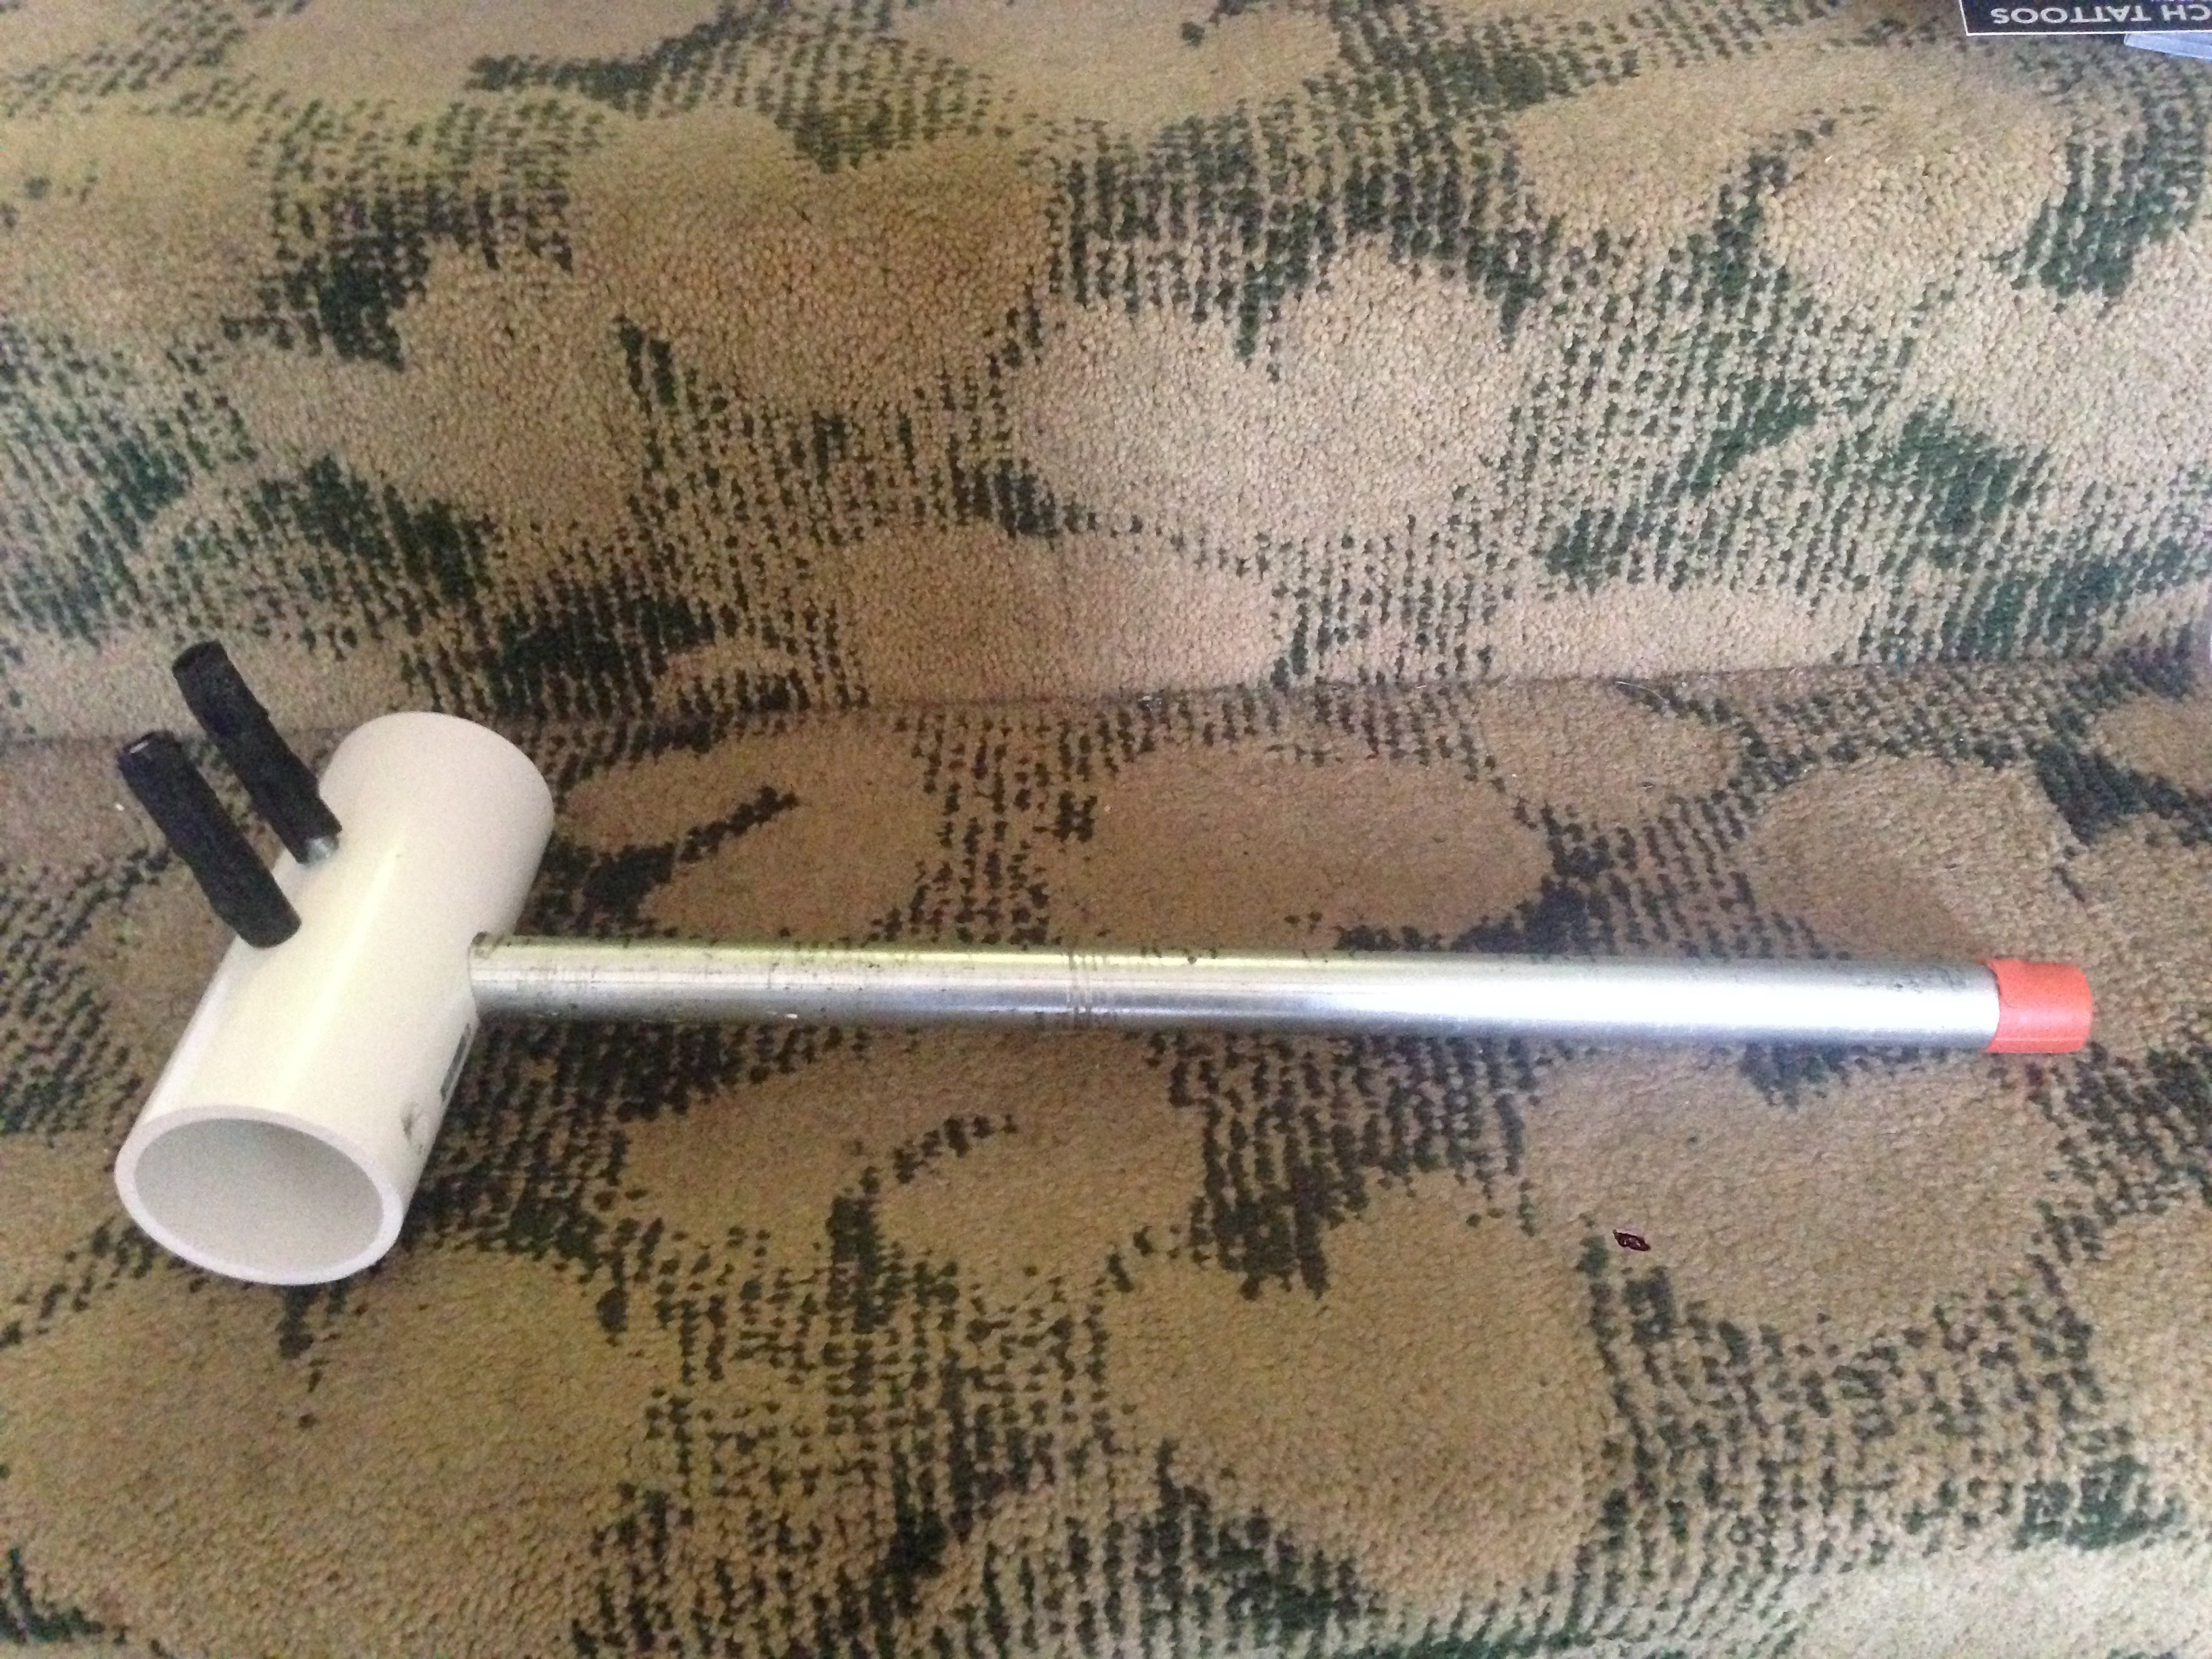
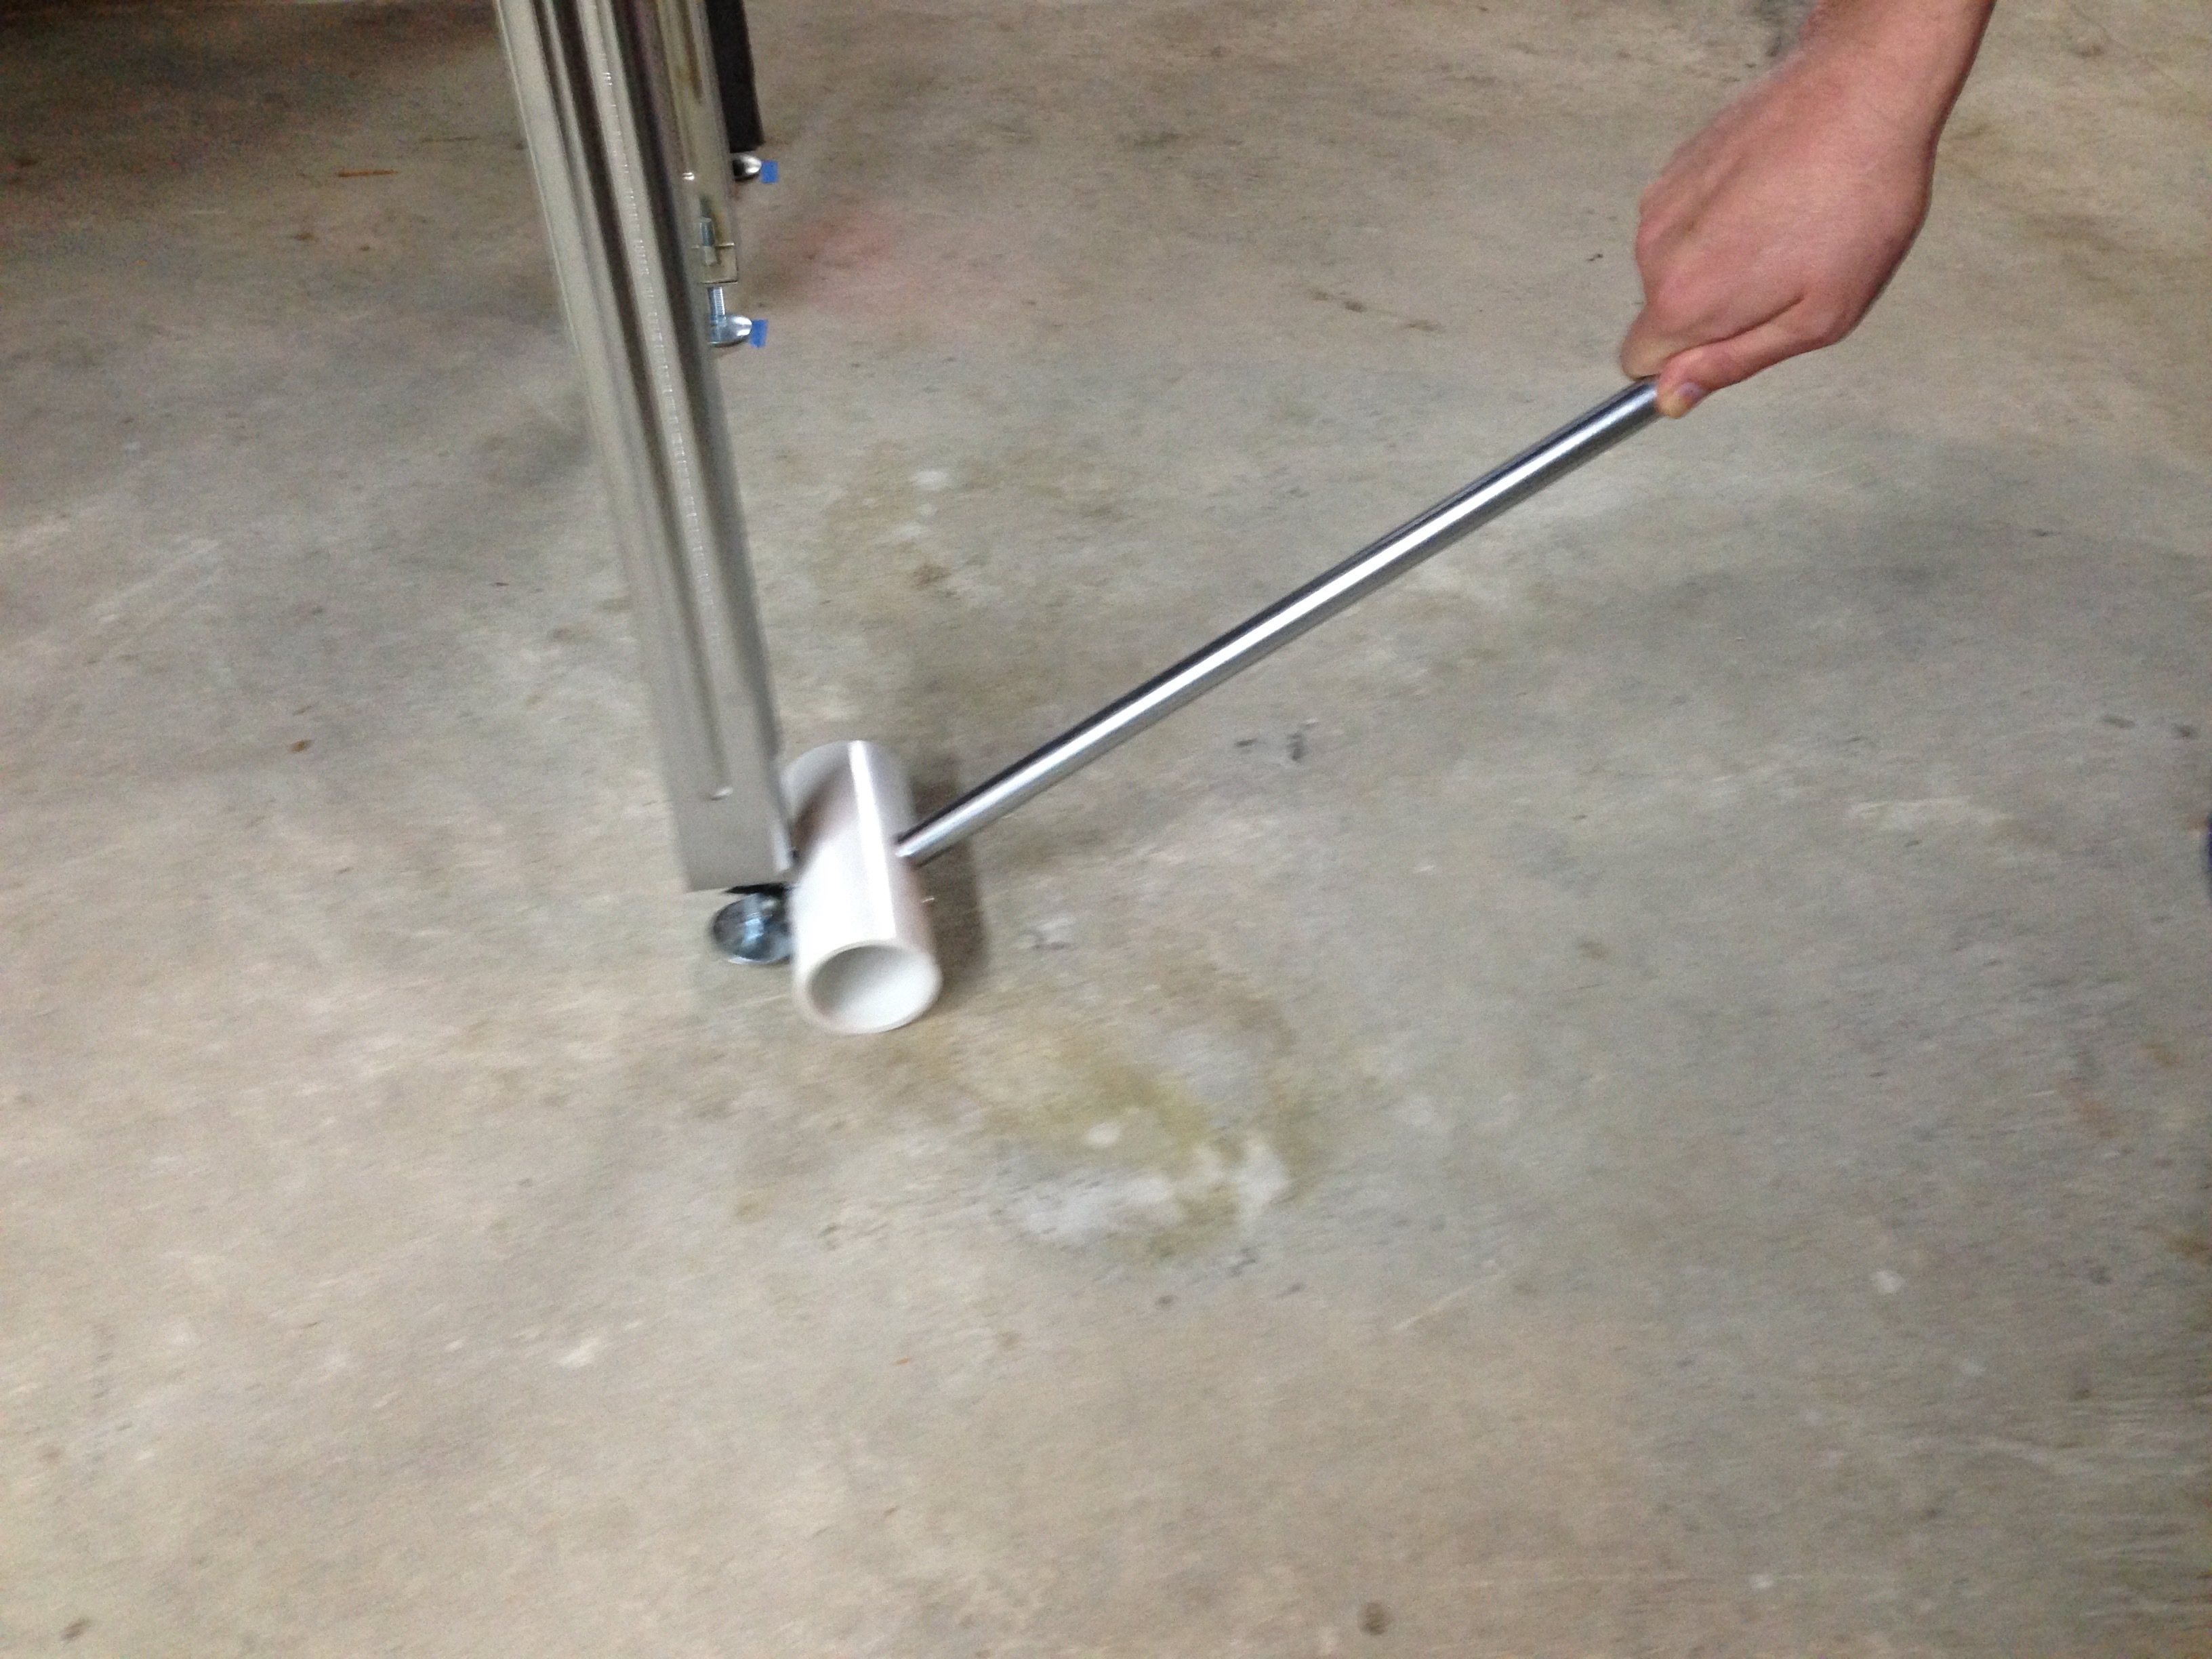
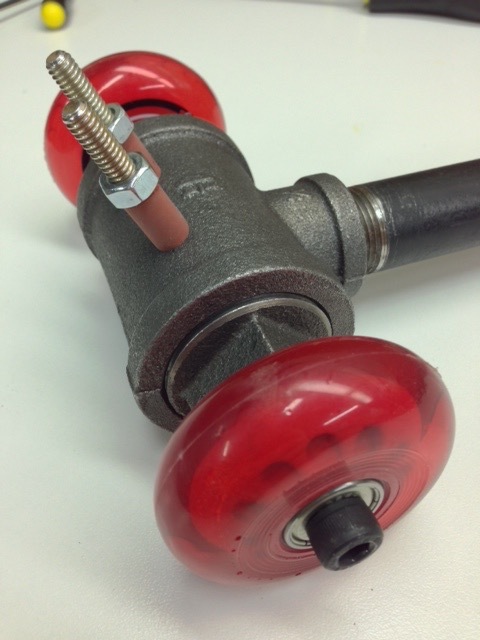
On concrete or thin carpet the PVC ones slide somewhat to limit torque on the legs. His second revision used roller-blade wheels to address the concern that on thicker pile carpet you might be torquing the legs.
11 Likes
This looks like a very useful tool. Are they available anywhere? Any chance on getting directions on how to make one if not?
What do you think would seem like a reasonable price point? My friend considered making them, but concluded the market was likely too small and that if they were popular people could knock them off pretty easily. After seeing his PVC “Model 1”, I made 2 for PAPA with about $20-30 in parts from Home Depot and an hour in a shop with a bandsaw, drill-press and sander. I think his later all-steel/roller-blade-wheel model had a parts cost around $30-35, and required a couple of jigs for drilling and tapping the holes. It does have the advantage that the prods can be closer together, which makes it a bit easier to handle.
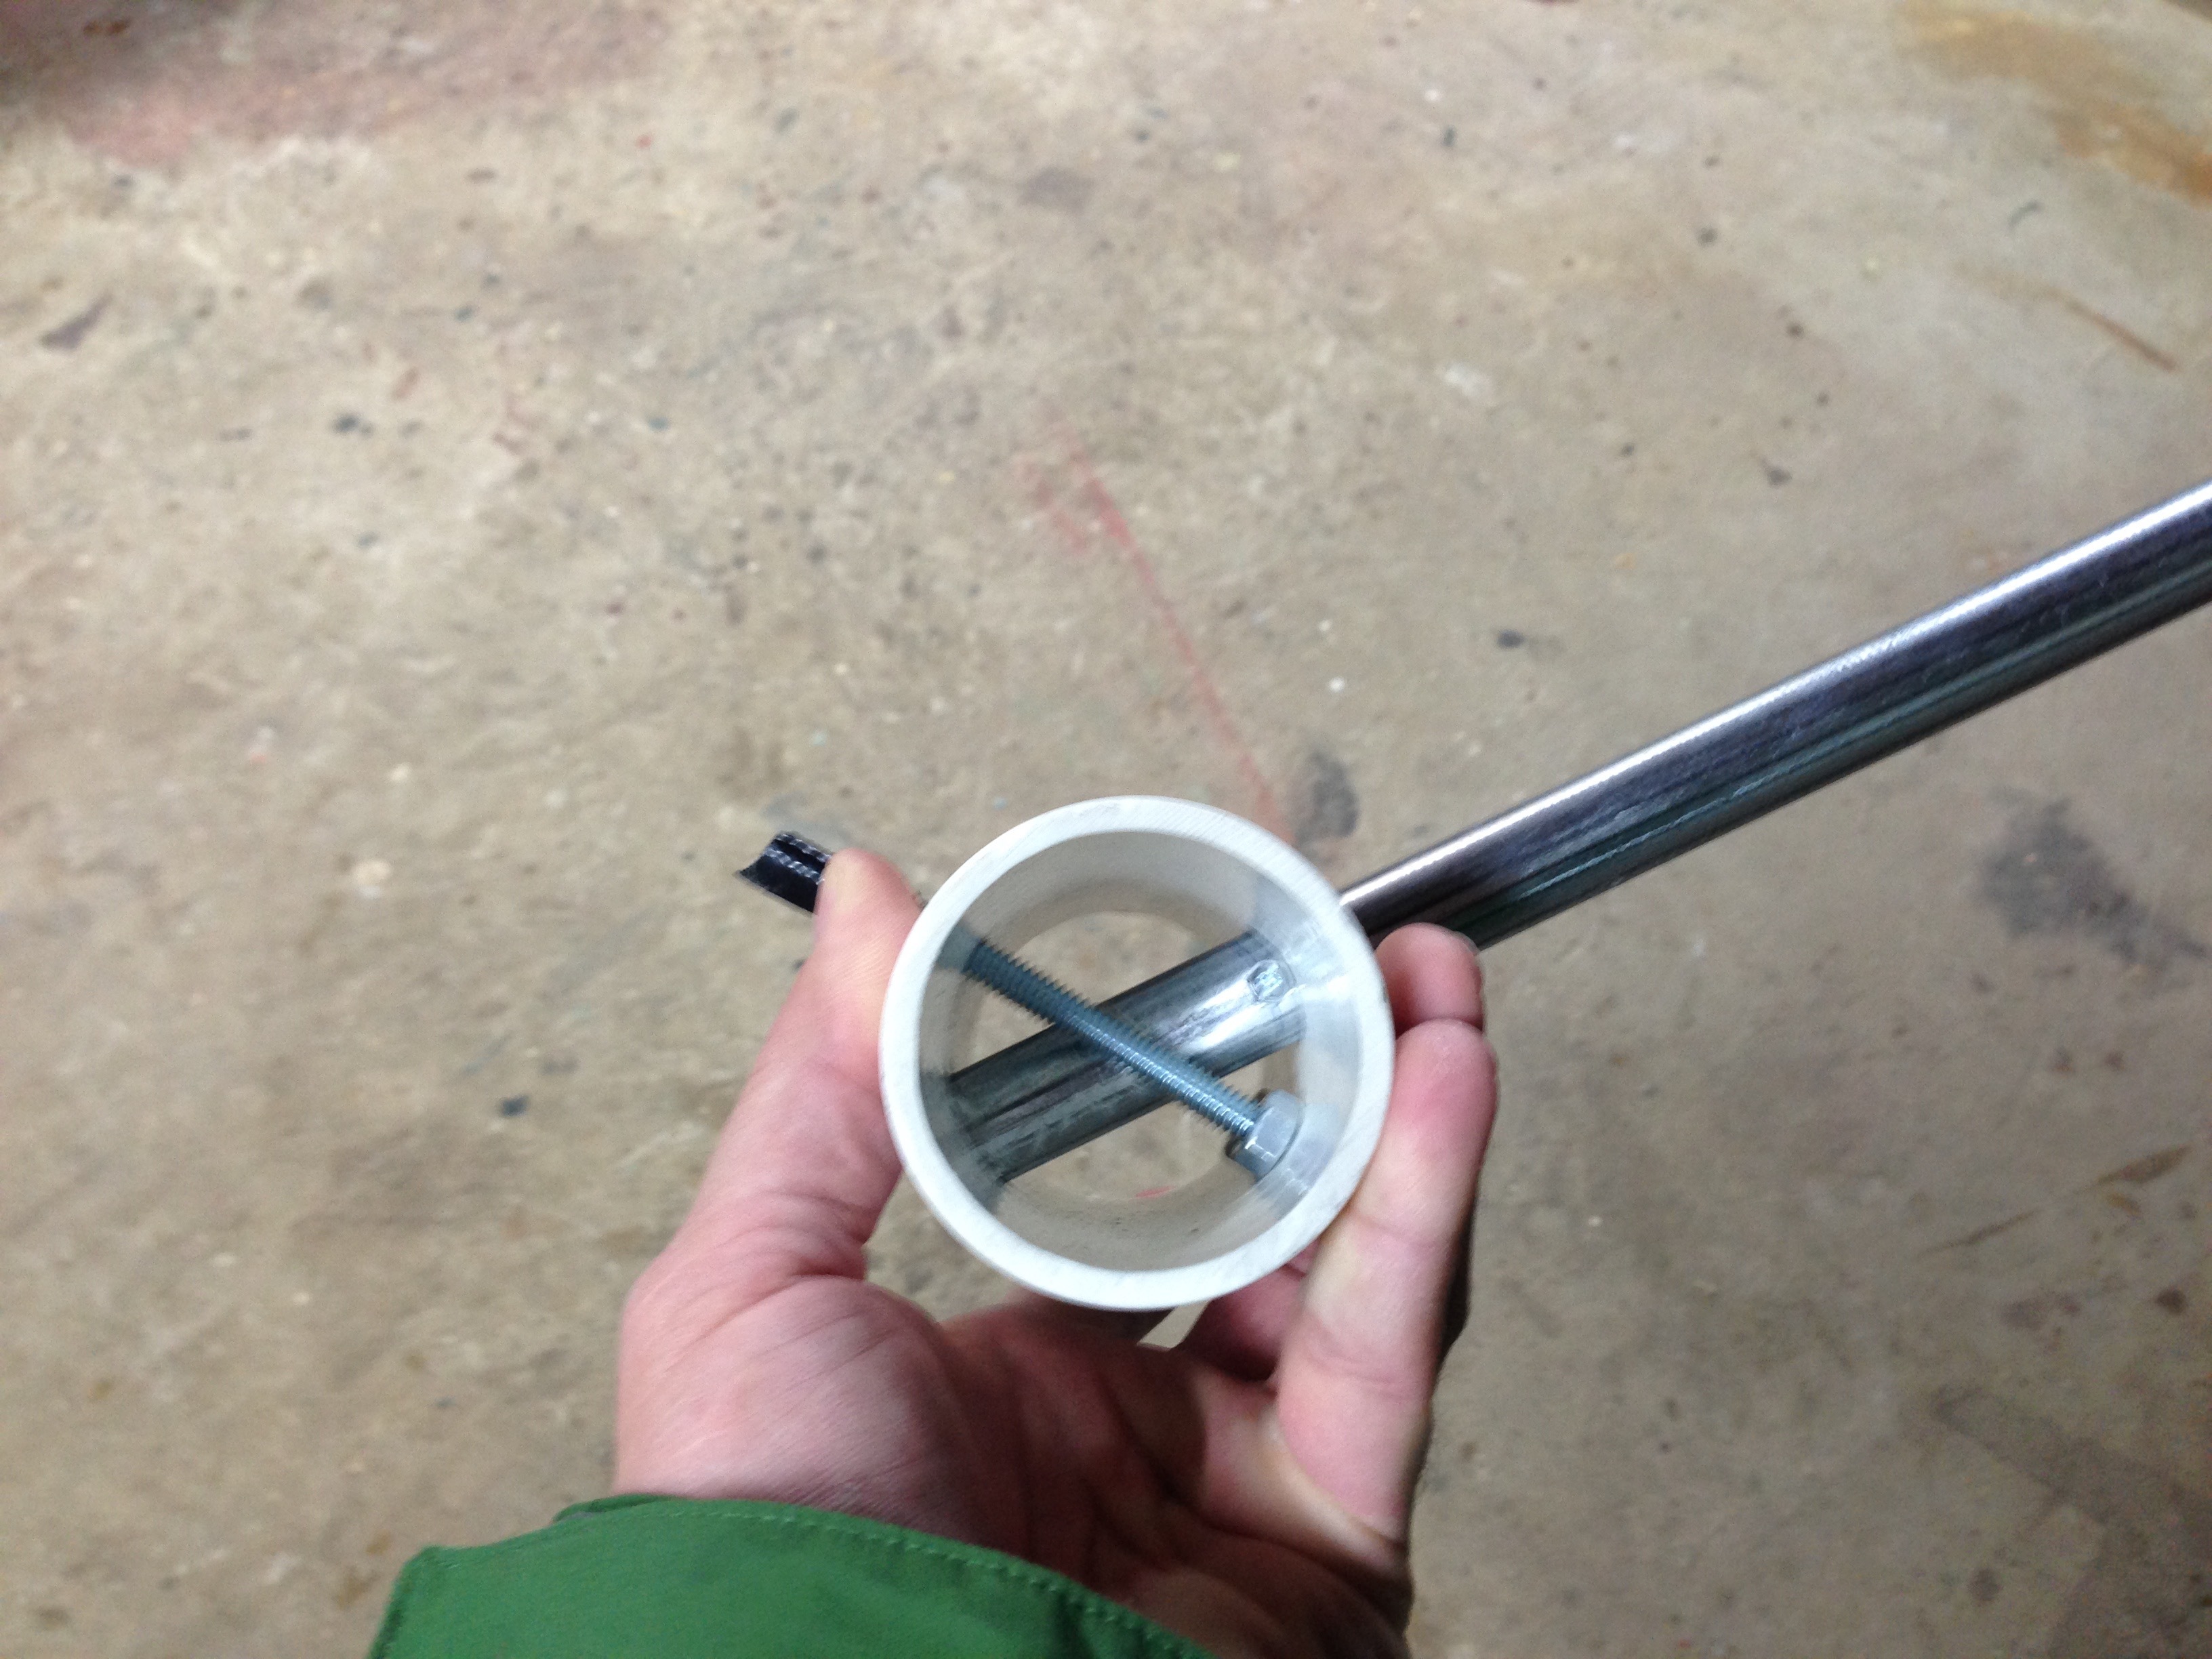
For the PVC model, you can buy the smaller diameter black pipe pre-cut to a reasonable length, the PVC you have to cut yourself. The prods are simply threaded bolts wrapped in a piece of bicycle inner-tube and electrical tape (which I’m not sure is strictly necessary, as the later models didn’t do that). Both the black pipe and bolts go all the way thru the PVC pipe, so the only hard bit is drilling the holes straight/parallel. The prods are only as far apart as they must be to provide clearance for the pipe. Basically in the middle the 2 bolts and the black pipe are touching. I recommend 1/4" Grade 8 (hardened steel) bolts or stainless that are threaded along the whole length. I drilled a hole diameter small enough so that the pre-threaded black pipe and bolts would cut threads into the PVC (and snug up nicely). You have to ream out one side to a slightly bigger diameter to clear the unthreaded part of the black pipe which is slightly larger diameter than the threaded side. A scrap of carpet can protect the floor from bolt heads if you want to use on hardwood/tile.
Given that pins are tippy 4-legged things and WMS’s long tradition of cows, the device was called a “Cattleprod”.
I also use the PinGuy app
$45 or $50 for the PVC model, or $70 for the mark-2 model, would be reasonable, given parts labor and markup. I may try and make one of these, but it would take a little work to get one made properly. Plus, it’s certainly worth something if I can just buy it.
1 Like